
Εφαρμογή PhotoRobot Controls - Λειτουργία Wizard και Λειτουργία Kiosk
Αυτό το εγχειρίδιο χρήστη παρέχει τεχνικές οδηγίες σχετικά με τη διαμόρφωση των βημάτων χειριστή και τη χρήση τους σε PhotoRobot Λειτουργία οδηγού. Σε PhotoRobot Controls App (αναφέρεται περαιτέρω ως "CAPP"), η λειτουργία Wizard χρησιμοποιεί μια σειρά από βήματα οδηγού για να καθοδηγήσει τους χρήστες σε διάφορες εργασίες. Αυτά τα βήματα ορίζονται σε μορφή γλώσσας που μοιάζει με JavaScript και μπορούν να γραφτούν από PhotoRobot σύμβουλοι για προσαρμοσμένη λειτουργικότητα. Οι χρήστες μπορούν επίσης να γράψουν βασικές λειτουργίες για αρχικά πειράματα ή απλές ρυθμίσεις.
Σημείωση: Οι ακόλουθες πληροφορίες παρέχουν τεχνικές οδηγίες για τη δημιουργία σεναρίων για προσαρμοσμένους οδηγούς και τα βήματα χειριστή τους. Αυτό περιλαμβάνει τον τρόπο πρόσβασης και εκκίνησης των οδηγών μετά τη δημιουργία τους ως απλοποιημένη διεπαφή χρήστη σε λειτουργία Kiosk στο CAPP. Για πληροφορίες που διευκολύνουν τη γενική κατανόηση και την πρώτη χρήση του CAPP, ανατρέξτε στο Εγχειρίδιο χρήστη PhotoRobot Getting Started.
1 - PhotoRobot Επισκόπηση λειτουργίας οδηγού
Η λειτουργία Οδηγού PhotoRobot επιτρέπει στους χρήστες να δημιουργήσουν μια διαμόρφωση μιας σειράς βημάτων που ένας χειριστής θα ακολουθήσει αργότερα για να καταγράψει ένα προϊόν. Μετά τη διαμόρφωση ενός οδηγού, η λειτουργία του PhotoRobot είναι τότε δυνατή σε λειτουργία Περιπτέρου, η οποία λειτουργεί ως ένα εξαιρετικά απλοποιημένο περιβάλλον χρήστη.
Οι οδηγοί και οι λειτουργίες Kiosk υποστηρίζουν επιχειρήσεις που θέλουν να κρύψουν πολύπλοκους ελέγχους στο παρασκήνιο, καθιστώντας τη λειτουργία του μηχανήματος σχεδόν αλάνθαστη. Παρέχουν στους χειριστές μια εξαιρετικά φιλική προς τον χρήστη εναλλακτική λύση στην παραδοσιακή διεπαφή ελέγχου.
Στις περισσότερες περιπτώσεις, και οι δύο λειτουργίες ρυθμίζονται κατά την εγκατάσταση του μηχανήματος ή προσαρμόζονται από έναν φωτογράφο ή διαχειριστή στούντιο. Αυτό επιτρέπει την εκμετάλλευση προ-προγραμματισμένων αυτοματισμών, συμπεριλαμβανομένων προεπιλογών και οδηγών που εξαφανίζονται στο παρασκήνιο για τους χειριστές μηχανημάτων.
2- Επισκόπηση λειτουργίας Kiosk
Στην πράξη, η λειτουργία Περιπτέρου κλειδώνει το περιβάλλον χρήστη για να εμφανίζει στον χρήστη μόνο ό,τι ο διαχειριστής του επιτρέπει ρητά να έχει πρόσβαση. Για παράδειγμα, ένας χρήστης σε λειτουργία Περιπτέρου θα μπορεί συνήθως να τραβήξει μόνο μια φωτογραφία και να προχωρήσει στο επόμενο βήμα.
Τα βήματα που ακολουθεί ο χειριστής είναι σύμφωνα με τον συγκεκριμένο οδηγό που χρησιμοποιείται. Ταυτόχρονα, ο χειριστής δεν θα μπορεί να έχει πρόσβαση ή καν να χρειάζεται να ανησυχεί για τυχόν ρυθμιζόμενες ρυθμίσεις. Αυτό συμβάλλει στη δραματική μείωση των καμπυλών εκμάθησης και των απαιτήσεων ενσωμάτωσης.
Είναι ακόμη δυνατό να απλοποιηθεί η λειτουργία του μηχανήματος σε ένα μόνο κουμπί εκκίνησης ή σε μια γρήγορη σάρωση ενός γραμμωτού κώδικα. Έτσι, τα στούντιο μπορούν να απασχολούν εργαζόμενους αποθήκης με πολύ λίγη εκπαίδευση, συμπεριλαμβανομένων εξωτερικών συνεργατών, ελεύθερων επαγγελματιών και φοιτητών πρακτικής άσκησης, για παράδειγμα.
3 - Πώς να αποκτήσετε πρόσβαση στη λειτουργία PhotoRobot Wizard
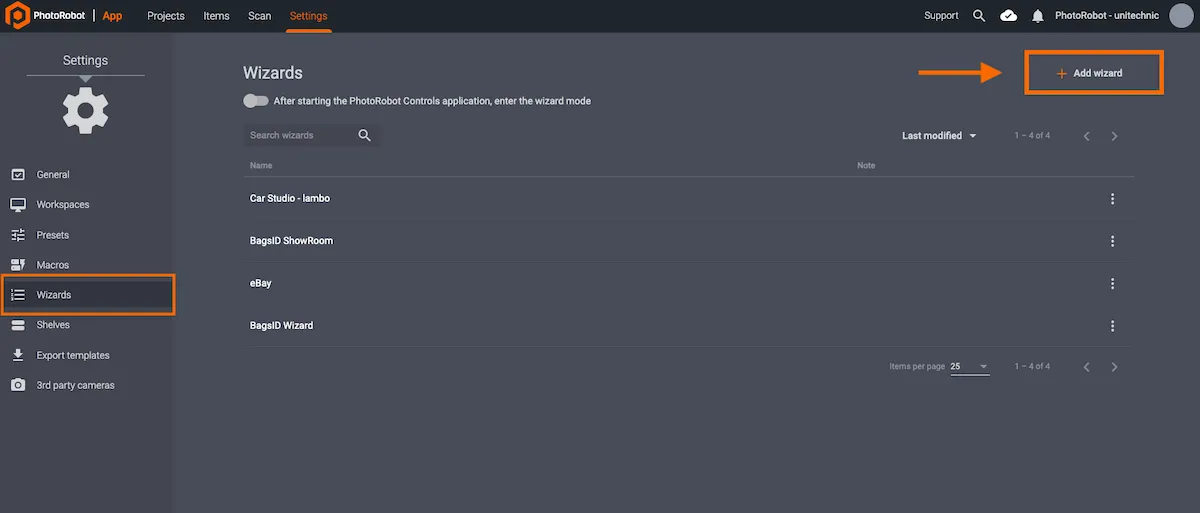
Για να αποκτήσετε πρόσβαση στη λειτουργία Wizards, ανοίξτε το μενού Ρυθμίσεις στην τοπική εφαρμογή. Εδώ, οι χρήστες μπορούν να φορτώσουν τους Οδηγούς μέσω του αριστερού μενού ή να δημιουργήσουν έναν νέο οδηγό χρησιμοποιώντας την Προσθήκη οδηγού στο επάνω δεξιό μέρος της διεπαφής:
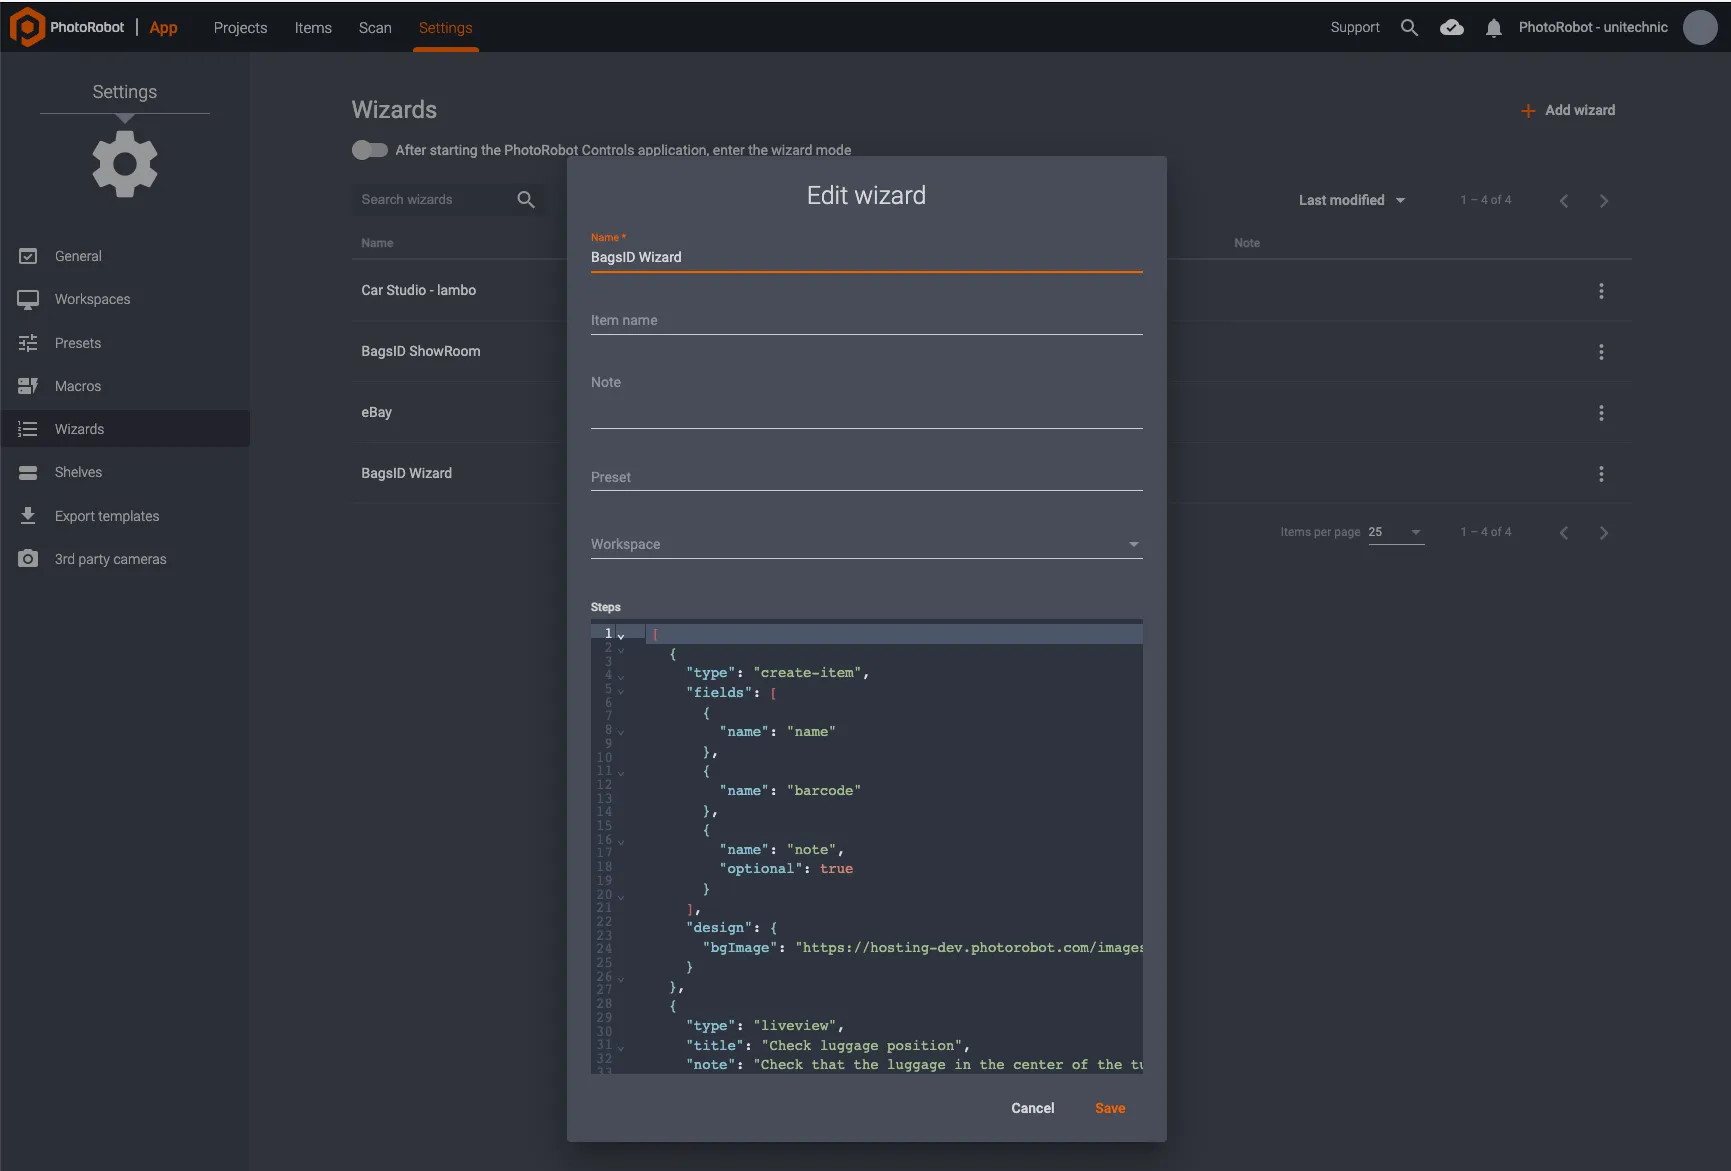
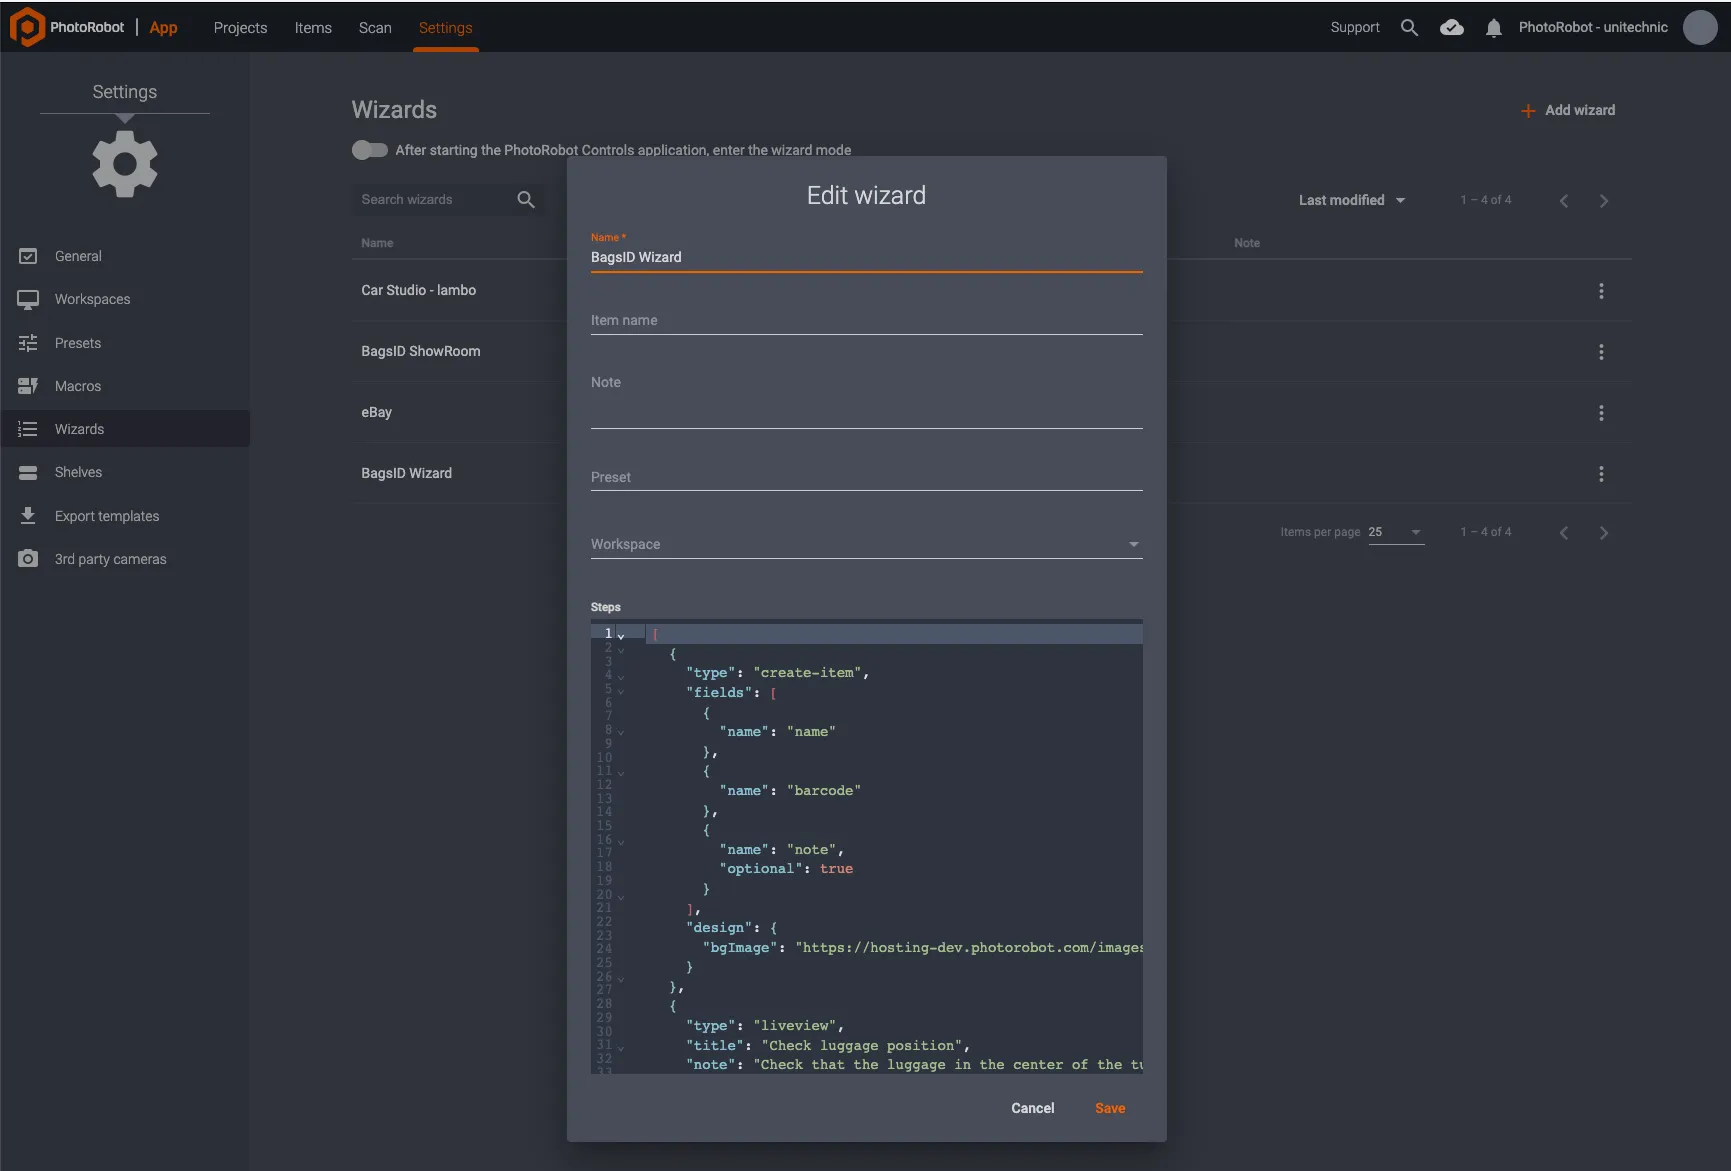
Οι επιλογές για τη δημιουργία, την επεξεργασία ή την προσαρμογή ενός οδηγού περιλαμβάνουν το όνομα του οδηγού, το όνομα στοιχείου, τις σημειώσεις, τις προκαθορισμένες ρυθμίσεις, το χώρο εργασίας και τα βήματα του οδηγού:
Σημείωση: Για να εκκινήσετε έναν οδηγό, πρέπει να περιέχει έγκυρες προεπιλογές, όλες τις διαμορφώσεις χώρου εργασίας και, το σημαντικότερο, τον αριθμό και τα ονόματα των φακέλων καταλόγου. Κάθε ένα από αυτά θα πρέπει στη συνέχεια να ταιριάζει με τα βήματα που ορίζονται στον Οδηγό για τη σωστή λειτουργία του.
4 - Δημιουργία Νέου Wizard
Για να δημιουργήσετε μια νέα λειτουργία οδηγού, ανοίξτε το μενού Ρυθμίσεις στην τοπική εφαρμογή και χρησιμοποιήστε τον Οδηγό προσθήκης στο επάνω δεξιό μέρος της διεπαφής:
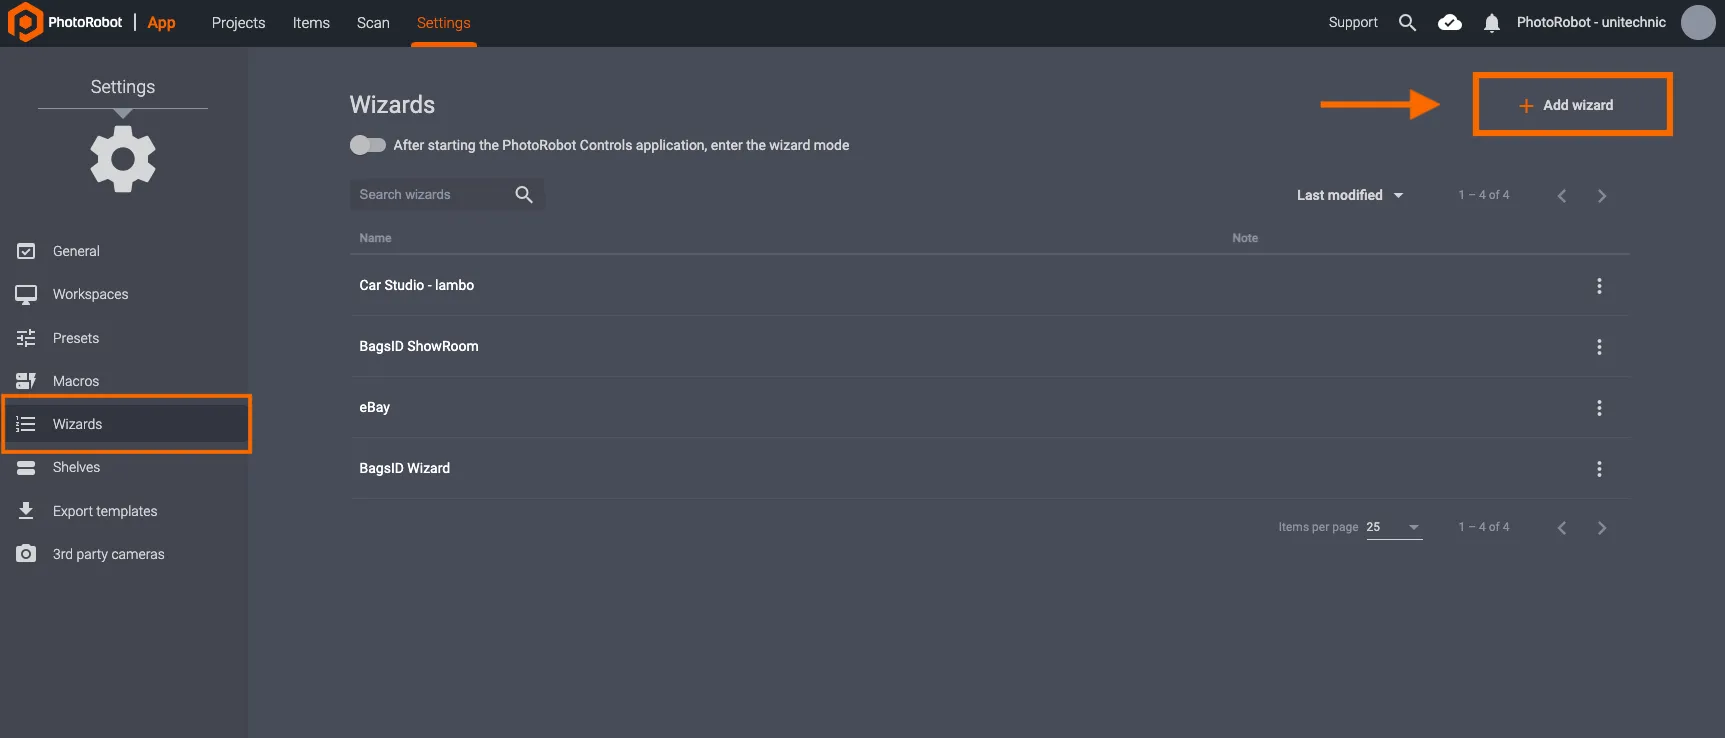
Σε αυτό το μενού, υπάρχουν επιλογές για τη δημιουργία, την επεξεργασία και την προσαρμογή οδηγών:
- Όνομα οδηγού
- Όνομα στοιχείου
- Σημειώσεις
- Προεπιλογές
- Χώρο εργασίας
- Βήματα οδηγού
Σημείωση: Για να εκκινήσετε έναν οδηγό, πρέπει να περιέχει έγκυρες προεπιλογές, όλες τις διαμορφώσεις χώρου εργασίας και, το σημαντικότερο, τον αριθμό και τα ονόματα των φακέλων καταλόγου. Κάθε ένα από αυτά θα πρέπει στη συνέχεια να ταιριάζει με τα βήματα που ορίζονται στον Οδηγό για τη σωστή λειτουργία του.
5 - Βήματα Wizard
Κάθε οδηγός περιέχει μια λίστα βημάτων. Οι ακόλουθοι τύποι βημάτων είναι διαθέσιμοι:
- δημιουργία-στοιχείο
- Επιλογή στοιχείου
- Capture-φάκελος
- εισαγωγή-εικόνες
- Ζωντανή προβολή
6 - Λεπτομερείς Περιγραφές Βημάτων
δημιουργία-στοιχείο
Περιγραφή
Το βήμα create-item επιτρέπει στο χρήστη να δημιουργήσει ένα νέο στοιχείο. Οι χρήστες ορίζουν στοιχεία ως εξής και με τα ακόλουθα αντικείμενα.
- δακτυλογραφώ: "Δημιουργία-στοιχείο"
- Πεδία: Αυτός ο πίνακας αντικειμένων ορίζει τα πεδία για τη δημιουργία στοιχείων. Τα πεδία μπορούν να περιλαμβάνουν "όνομα", "γραμμωτός κώδικας", "κώδικας παρακολούθησης", "σύνδεσμος", "σημείωση", "ετικέτες", "χώρος εργασίας". Κάθε πεδίο μπορεί επίσης να επισημανθεί ως προαιρετικό.
- σχεδιάζω: Αυτό το αντικείμενο καθορίζει πτυχές σχεδίασης όπως "bgImage" (διεύθυνση URL εικόνας φόντου) και "bgColor" (χρώμα φόντου).
Παράδειγμα
JavaScript:
{
"type": "δημιουργία-στοιχείο",
"πεδία": [
{
"name": "όνομα"
},
{
"name": "σημείωση",
"προαιρετικό": αληθές
}
],
"σχεδιασμός": {
"bgImage": "https://hosting. photorobot.com/images/-ML2QkR2lrhwn5SVMaEu/-NMSZjM-bdArdYcaa9XJ/NORMAL/c3o4fsHCXth55bOAZZNk8A?w=1920"
}
}
Επιλογή στοιχείου
Περιγραφή
Το βήμα επιλογής στοιχείου επιτρέπει στο χρήστη να επιλέξει ένα υπάρχον στοιχείο. Οι χρήστες συνήθως ενεργοποιούν αυτό το βήμα όταν η λίστα στοιχείων έχει ήδη δημιουργηθεί, για παράδειγμα μετά την εισαγωγή από CSV.
- δακτυλογραφώ: "Επιλογή στοιχείου"
- σχεδιάζω: Αυτό το αντικείμενο καθορίζει τις πτυχές σχεδίασης, παρόμοιες με το στοιχείο δημιουργίας.
Παράδειγμα
JavaScript:
{
"type": "select-item",
"σχεδιασμός": {
"bgImage": "https://hosting. photorobot.com/images/-ML2QkR2lrhwn5SVMaEu/-NMSZjM-bdArdYcaa9XJ/NORMAL/c3o4fsHCXth55bOAZZNk8A?w=1920"
}
}
Capture-φάκελος
Περιγραφή
Το βήμα capture-folder επιτρέπει στο χρήστη να καταγράψει ένα φάκελο.
- δακτυλογραφώ: "φάκελος καταγραφής"
- τίτλος: Τίτλος του βήματος
- σημείωση: Περιγραφή ή οδηγίες για το βήμα.
- dirName: Όνομα του καταλόγου όπου θα αποθηκευτούν οι εικόνες.
- προαιρετικός: Εάν αληθεύει, αυτό το βήμα είναι προαιρετικό και ο χρήστης μπορεί να το παραλείψει.
- αντιγραφή (προαιρετικά): Αντιγράψτε τις εικόνες που έχετε τραβήξει σε άλλο φάκελο.
- copy toDir: Φάκελος προορισμού
- Φίλτρο αντιγραφής: Προαιρετικό φίλτρο, θα αντιγραφούν μόνο εικόνες που ταιριάζουν με "swingAbs", "turnAbs" ή "label".
Παράδειγμα 1 - Απλή λήψη φακέλου
JavaScript:
{
"type": "capture-folder",
"title": "Σύλληψη εσωτερικού",
"note": "Λήψη εσωτερικού χώρου με κάμερα χειρός.",
"dirName": "λεπτομέρειες"
}
Παράδειγμα 2 - Λήψη φακέλου και αντιγραφή επιλεγμένων εικόνων σε άλλο φάκελο
JavaScript
{
"type": "capture-folder",
"title": "Σύλληψη περιστροφής",
"dirName": "περιστροφή",
"αντίγραφο": {
"toDir": "φωτογραφίες",
"φίλτρο": [
{ "swingAbs": 10, "turnAbs": 0 },
{ "swingAbs": 10, "turnAbs": 45 },
{ "swingAbs": 10, "turnAbs": 180 }
]
}
}
εισαγωγή-εικόνες
Περιγραφή
Το βήμα εισαγωγής-ειδώλων επιτρέπει στο χρήστη να εισάγει εικόνες από το δίσκο. Τα αντικείμενα μέσα σε αυτό το βήμα περιλαμβάνουν τα ακόλουθα.
- δακτυλογραφώ: "Εισαγωγή-εικόνες"
- τίτλος: Τίτλος του βήματος
- σημείωση: Περιγραφή ή οδηγίες για το βήμα
- dirName: Όνομα του φακέλου όπου θα αποθηκευτούν οι εικόνες
- προαιρετικός: Εάν είναι αληθές, αυτό το βήμα είναι προαιρετικό και ο χρήστης μπορεί να το παραλείψει
Παράδειγμα
JavaScript:
{
"type": "capture-folder",
"title": "Σύλληψη εσωτερικού",
"note": "Εισαγωγή εικόνων που έχουν ληφθεί με κάμερα χειρός.",
"dirName": "εσωτερικό"
}
Ζωντανή προβολή
Περιγραφή
Το βήμα liveview ενεργοποιεί τη ζωντανή προβολή της κάμερας. Οι χρήστες συνήθως ενεργοποιούν αυτό για να ελέγξουν τη θέση του αντικειμένου.
- δακτυλογραφώ: "Ζωντανή προβολή"
- σημείωση: Περιγραφή ή οδηγίες για το βήμα
- cameraAngle (προαιρετικό): Καθορίζει τη γωνία κάμερας για ζωντανή προβολή
Παράδειγμα
JavaScript:
{
"type": "liveview",
"title": "Έλεγχος θέσης",
"note": "Ελέγξτε τη θέση του αντικειμένου και βεβαιωθείτε ότι είναι κεντραρισμένο."
}
7 - Παράδειγμα Χρήσης
Το παρακάτω παράδειγμα δημιουργεί ένα βήμα οδηγού για τη δημιουργία στοιχείων, χρησιμοποιώντας πεδία για όνομα και σημειώσεις (προαιρετικά) και ένα σχέδιο με εικόνα φόντου και χρώμα.
JavaScript:
[
{
"type": "select-item",
"πεδία": [
{
"name": "όνομα"
},
{
"name": "σημείωση",
"προαιρετικό": αληθές
}
],
"σχεδιασμός": {
"bgImage": "https://hosting. photorobot.com/images/-ML2QkR2lrhwn5SVMaEu/-Nehz_ciyDihw90EgNuy/FINAL/tqZxrqbKZ4exH6y2LFPWUw?w=1200"
}
},
{
"type": "liveview",
"title": "Ελέγξτε τη θέση",
"σημείωση": "Ελέγξτε ότι το άτομο είναι ορατό.",
"cameraAngle": 15
},
{
"type": "capture-folder",
"title": "Σύλληψη περιστροφής",
"dirName": "περιστροφή"
},
{
"type": "capture-folder",
"title": "Λήψη φωτογραφιών",
"dirName": "φωτογραφίες"
}
]
Σημείωση: Αυτός είναι ένας γενικός κώδικας που επιτρέπει αρχικά πειράματα και απλή ρύθμιση σεναρίου από PhotoRobot χρήστες. Χρησιμοποιήστε το για να ελέγξετε τη λειτουργικότητα των Wizards και να εκτελέσετε μια βασική δέσμη ενεργειών για πειραματισμό.
8 - Εκκίνηση Οδηγών
Για να ξεκινήσετε έναν Οδηγό, αναθέστε τον πρώτα σε ένα έργο και κάντε κλικ στο κουμπί Αποθήκευση:
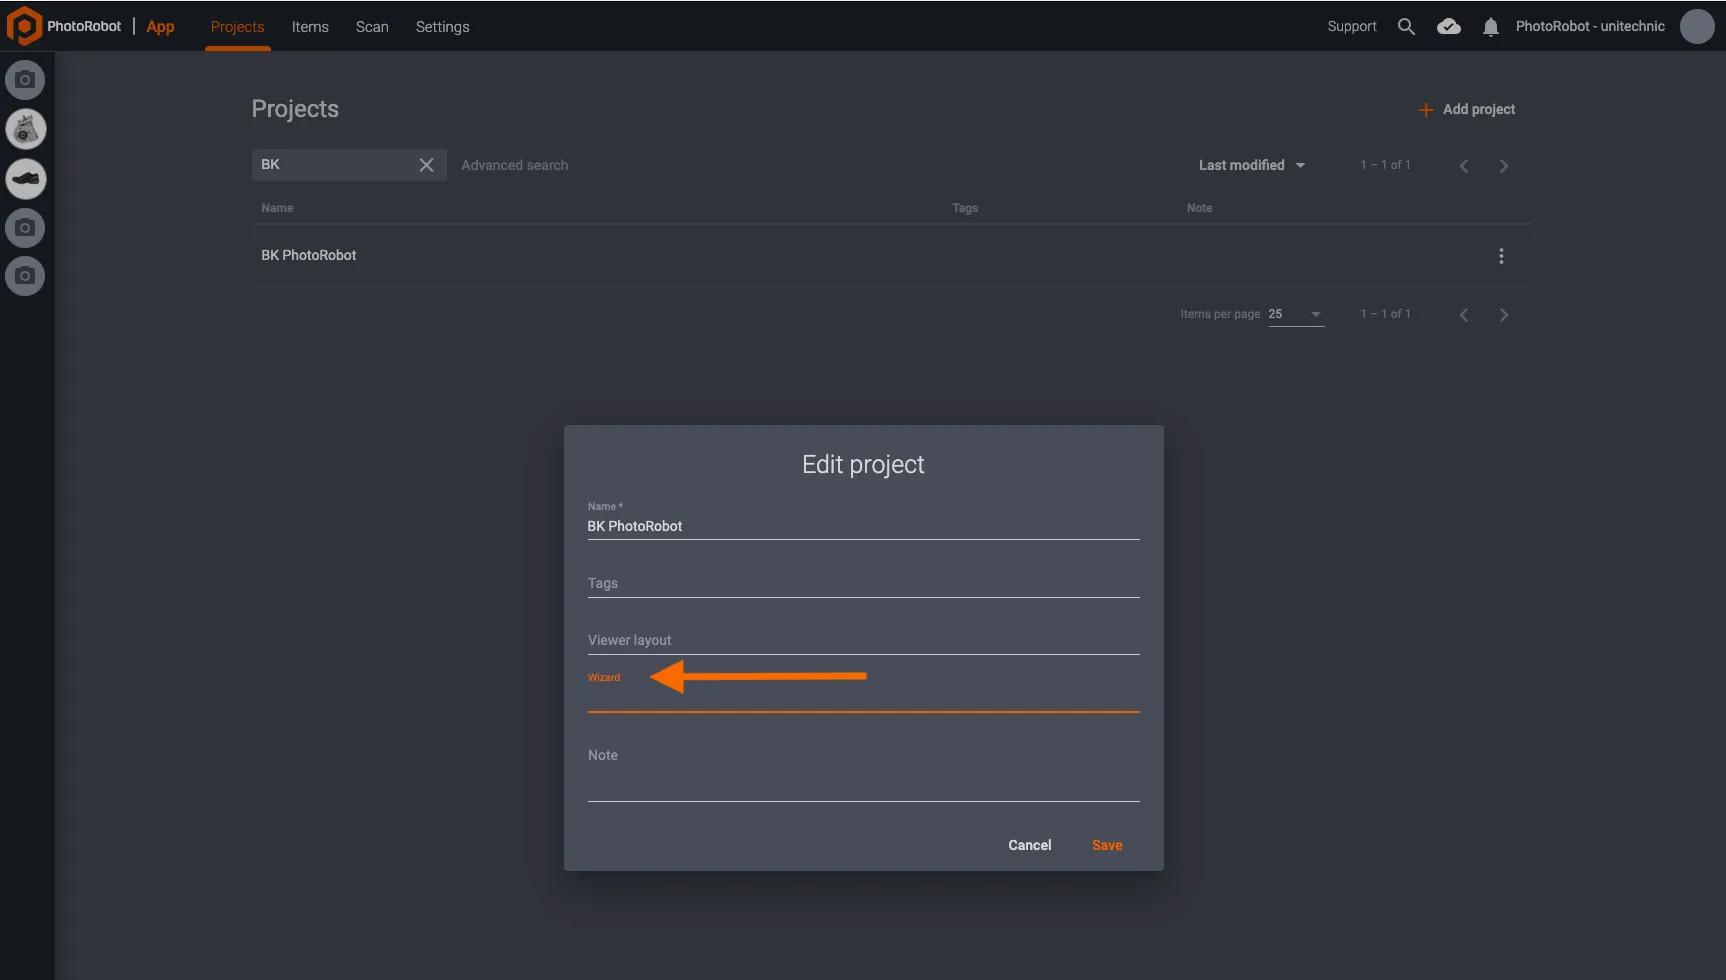
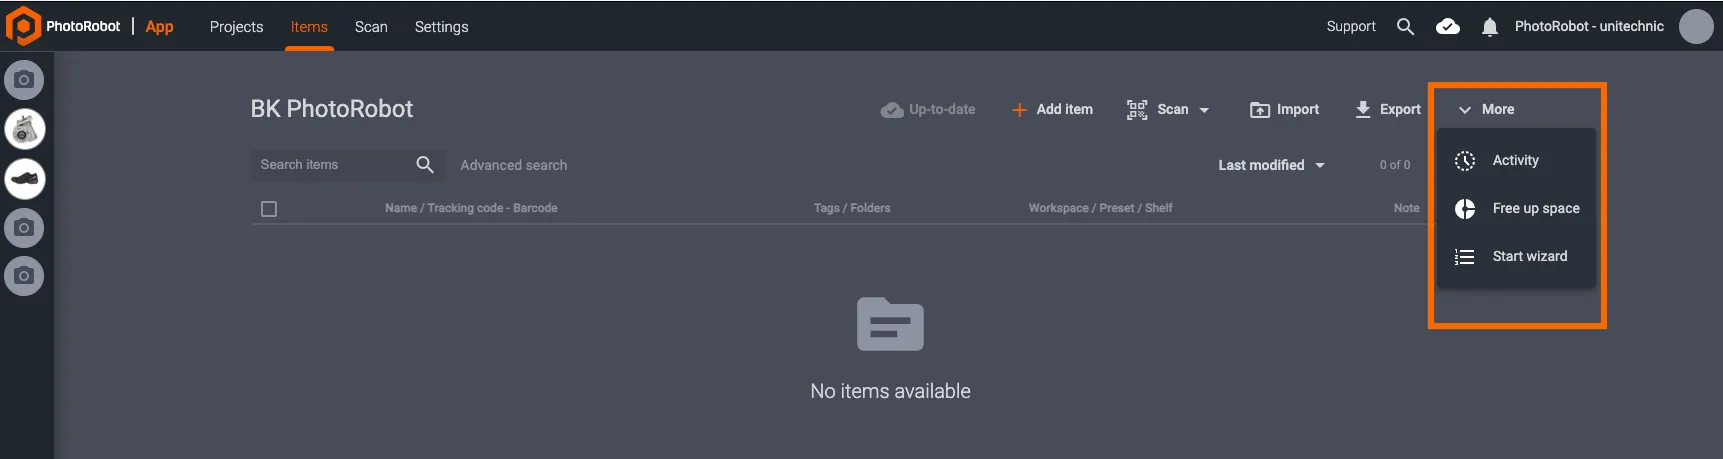
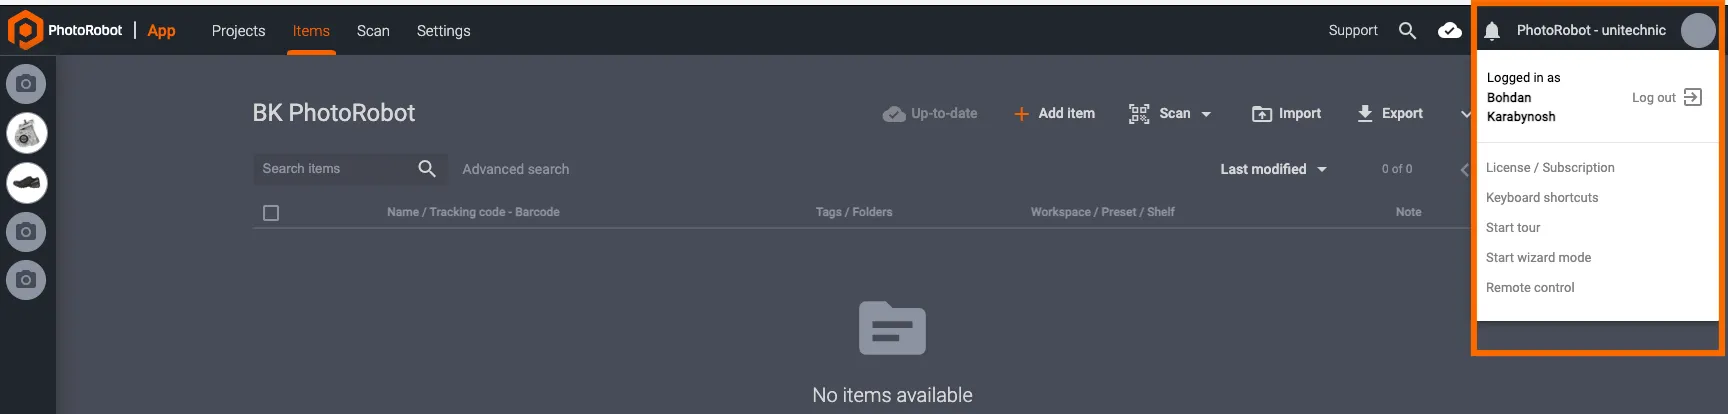
Μετά την ανάθεση του Οδηγού σε ένα Έργο, είναι δυνατή η εκκίνηση του Οδηγού με 2 τρόπους:
- Στο επάνω δεξιό μέρος της διεπαφής, κάντε κλικ στην επιλογή Περισσότερα και Έναρξη οδηγού ή;
- Κάντε κλικ στο εικονίδιο Λογαριασμός χρήστη και κάντε κλικ στην επιλογή Έναρξη λειτουργίας οδηγού:
9 - Βήματα Χειριστή με Οδηγό Wizard σε Λειτουργία Kiosk
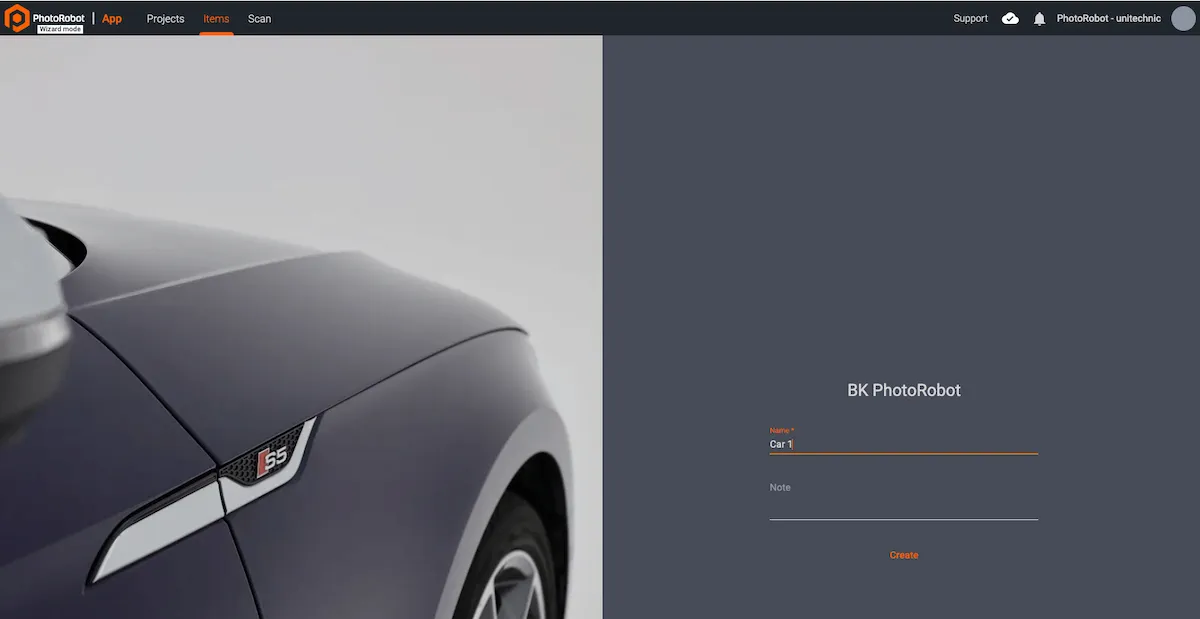
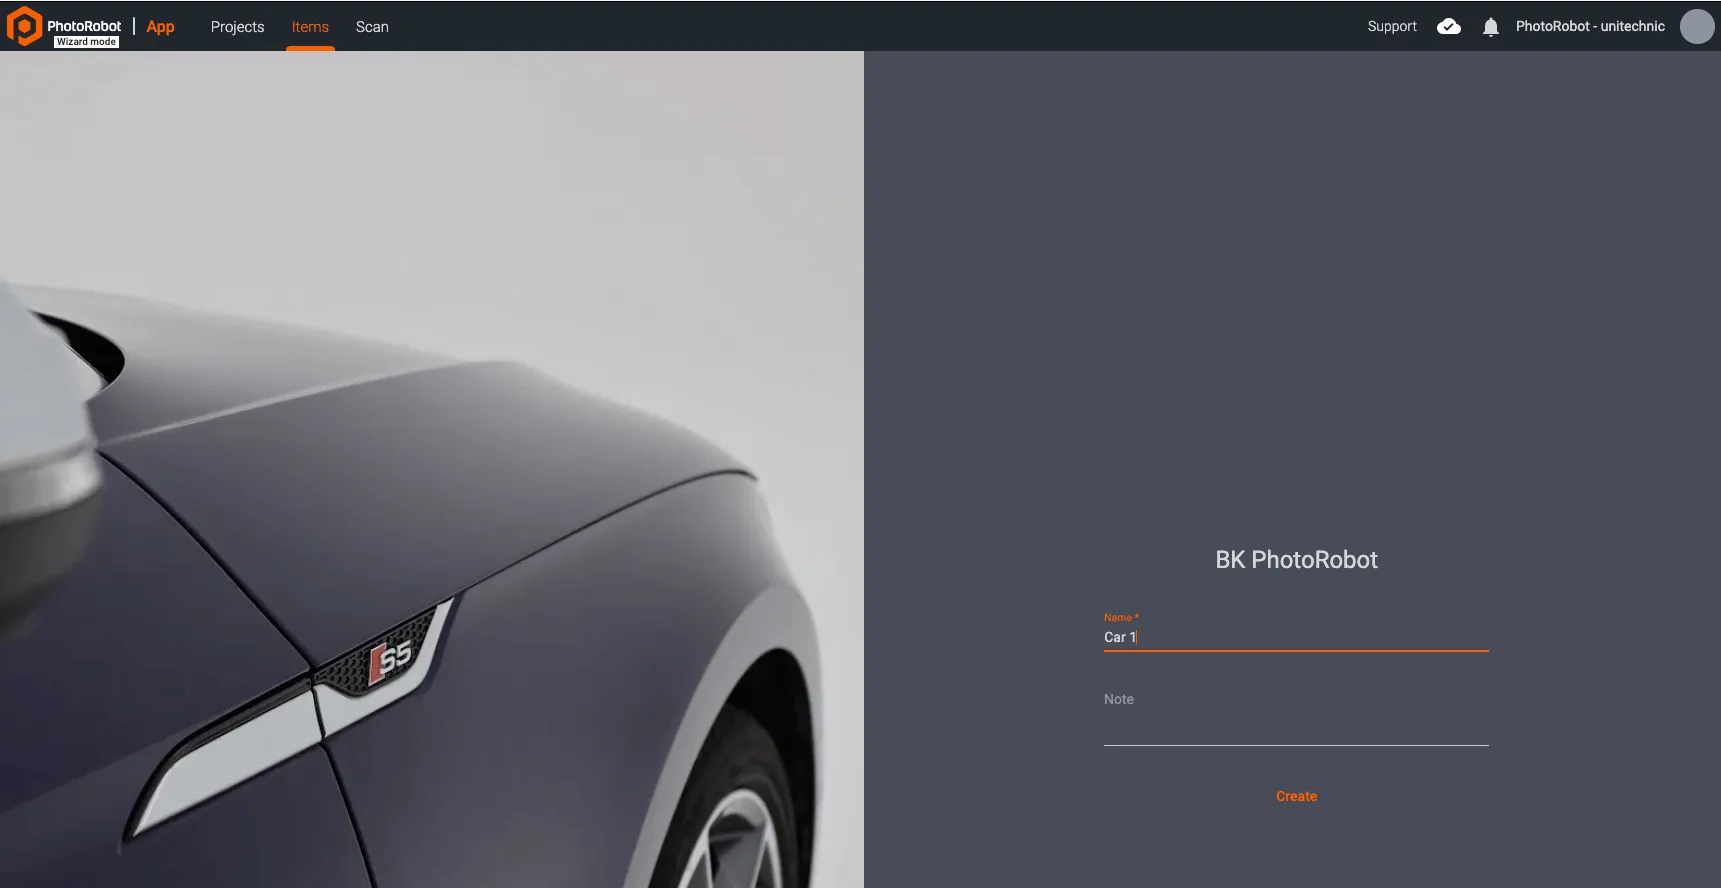
Με την επιτυχή εκκίνηση ενός οδηγού, η διεπαφή ανοίγει σε λειτουργία Kiosk και εμφανίζει το όνομα του Έργου στην κορυφή και το όνομα του Wizard από κάτω. Κάντε κλικ στο Δημιουργία για να εκκινήσετε τον οδηγό σε λειτουργία Kiosk:
Μετά την αρχική οθόνη, η απλοποιημένη διεπαφή χρήστη της λειτουργίας Kiosk θα εμφανίσει το πρώτο στάδιο στα προκαθορισμένα βήματα λειτουργίας. Από αυτό το σημείο και μετά, ο χειριστής πρέπει να ολοκληρώσει τις οδηγίες για κάθε στάδιο λήψης και να κάνει κλικ στο Επόμενο στο κάτω μέρος της διεπαφής λειτουργίας Kiosk για να προχωρήσει στα επόμενα βήματα:
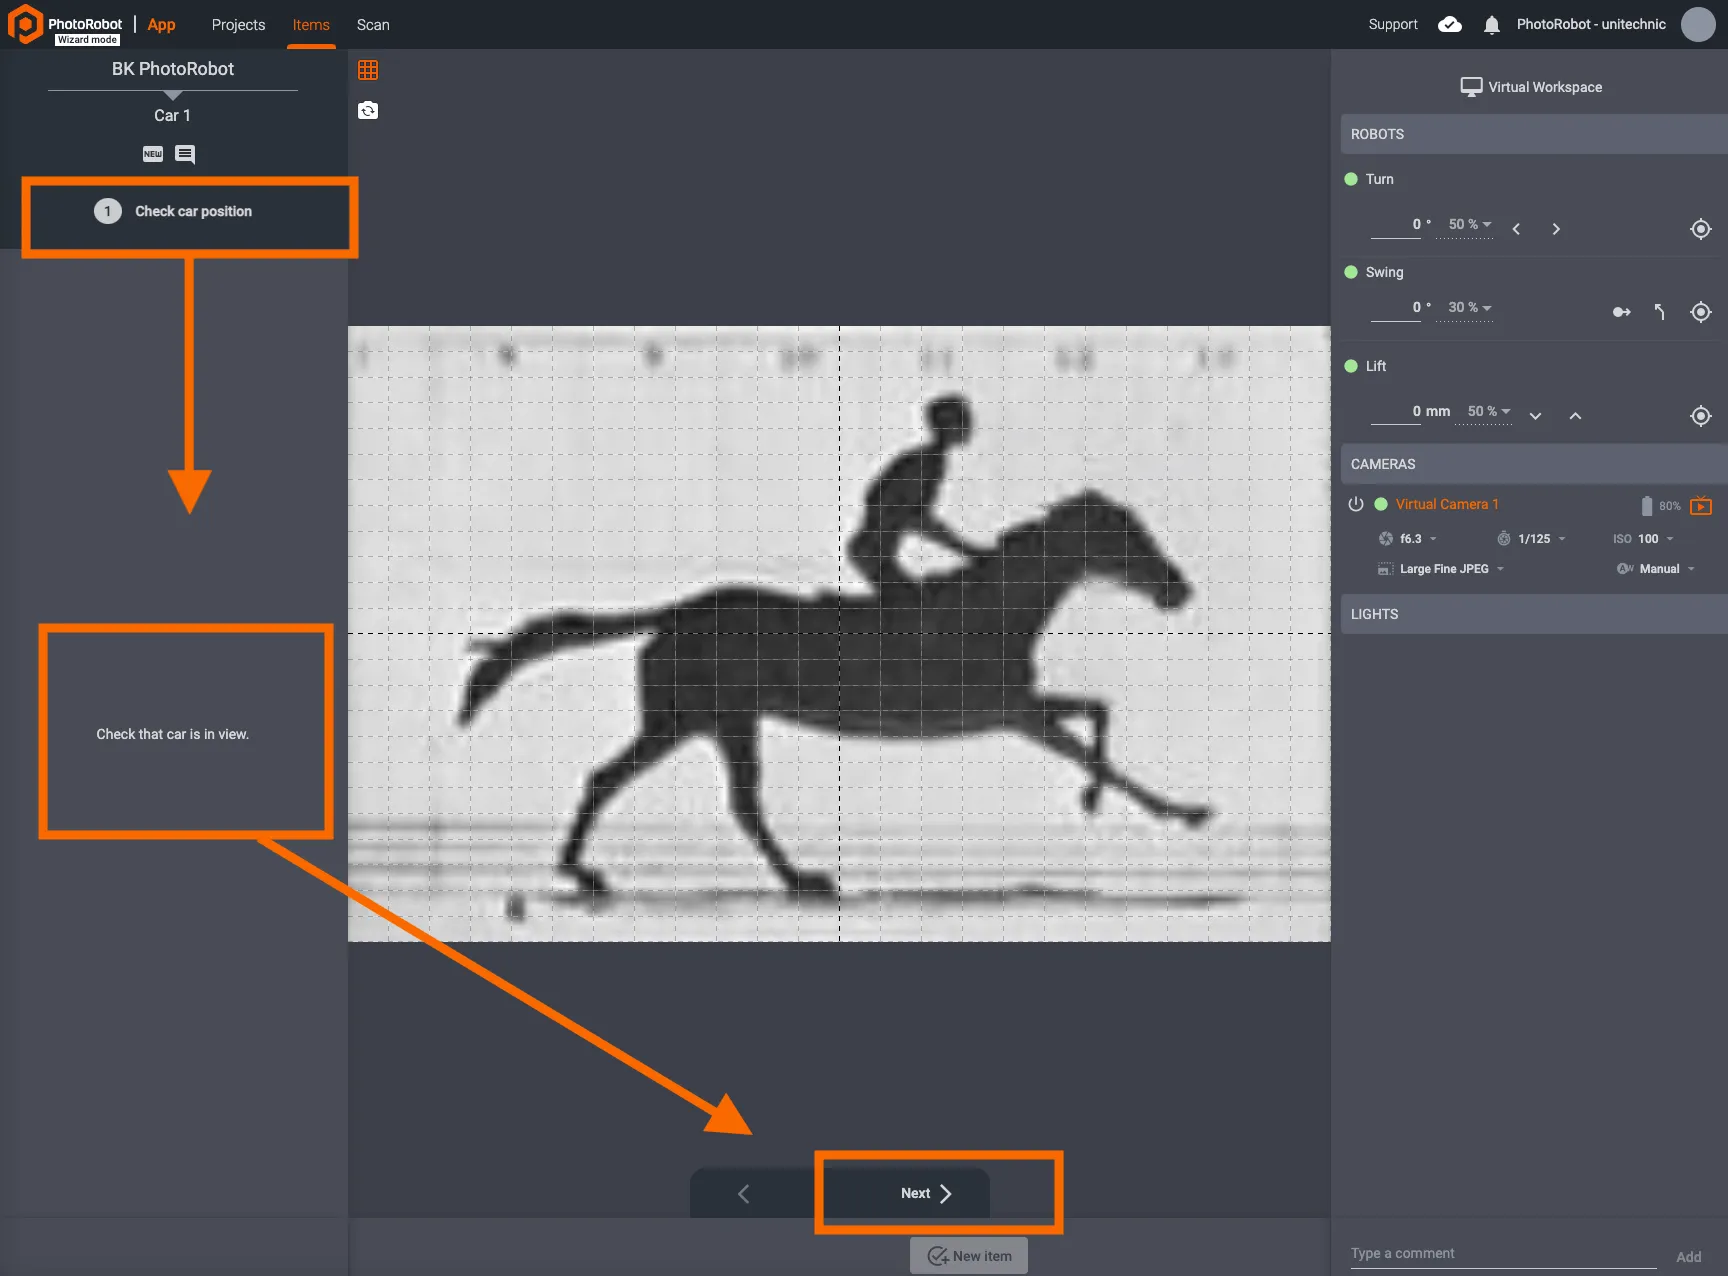
Συνήθως, το πρώτο βήμα θα δώσει εντολή στον χειριστή να διαμορφώσει την κάμερα (ή τις κάμερες) που θα χρησιμοποιηθούν. Εδώ, ο χειριστής ελέγχει επίσης ότι το προϊόν έχει τοποθετηθεί σωστά και ενόψει της κάμερας.
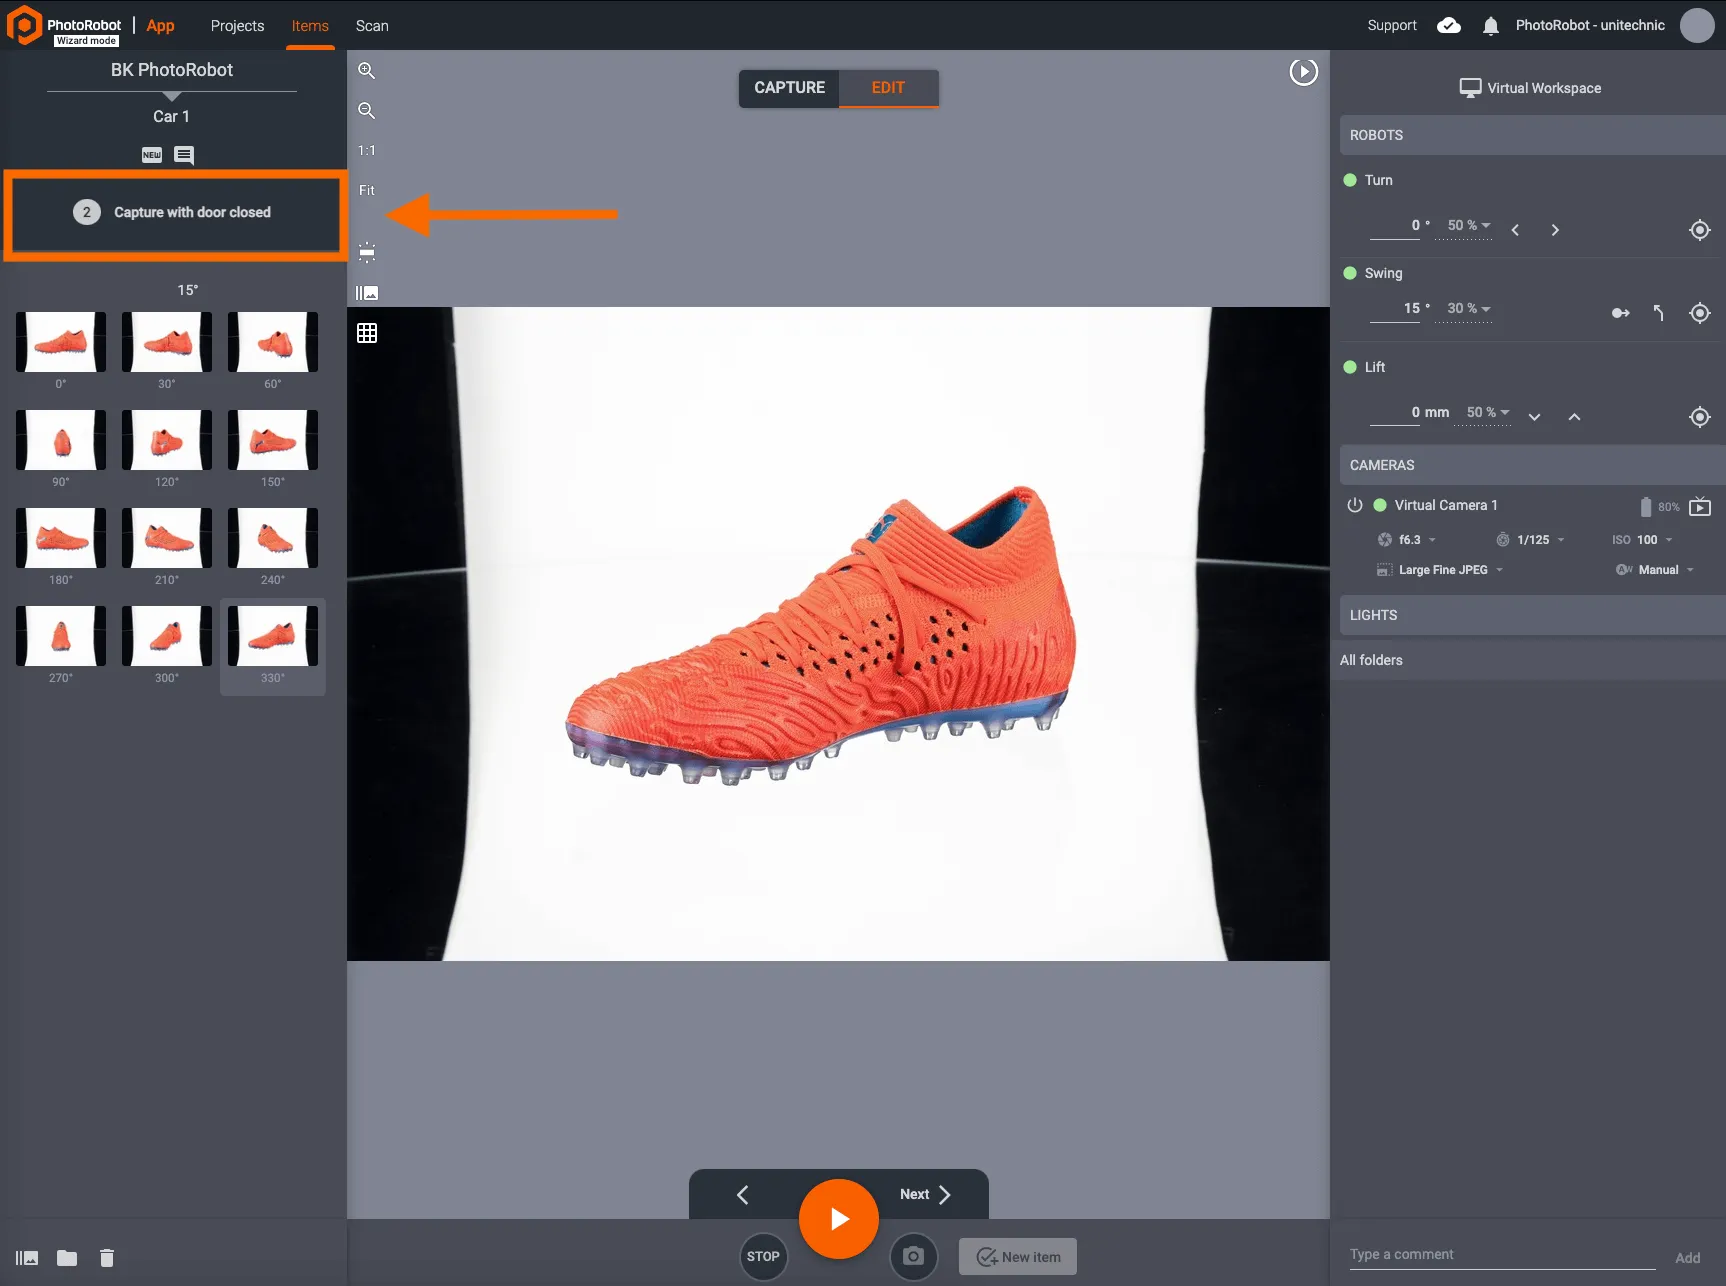
Στη συνέχεια, τα επόμενα βήματα κατευθύνουν τον χειριστή σύμφωνα με τις προεπιλογές για να καταγράψει δεδομένες γωνίες σε έναν συγκεκριμένο φάκελο. Αυτά τα βήματα μπορεί επίσης να περιλαμβάνουν οδηγίες για τη φωτογράφηση διαφορετικών διαμορφώσεων προϊόντων, όπως ένα αυτοκίνητο με τις πόρτες ανοιχτές, κλειστές ή τραβηγμένες από το εσωτερικό:
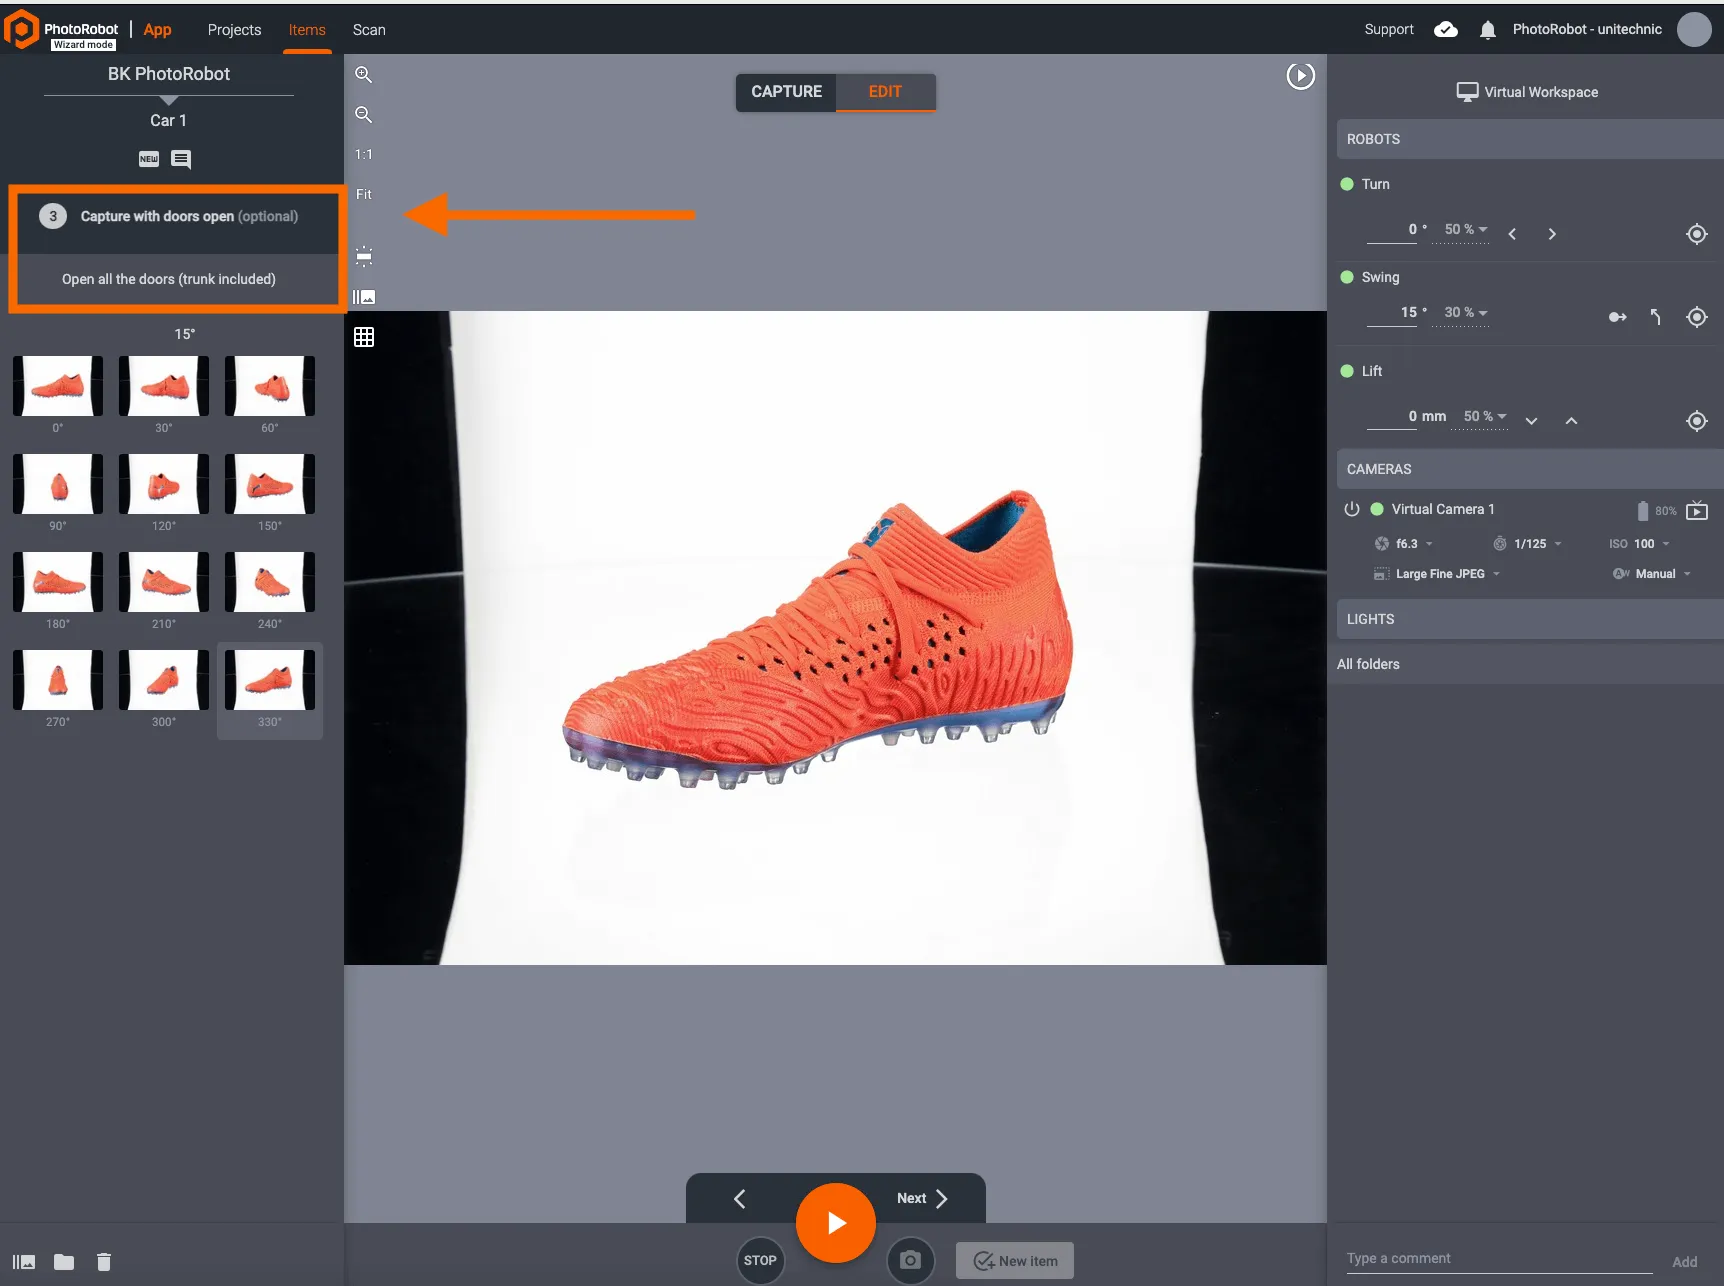
Επιπλέον, η λειτουργία Kiosk μπορεί να εμφανίζει σημειώσεις από τα βήματα του οδηγού για σαφέστερη επεξήγηση των επιμέρους σταδίων. Οι Σημειώσεις βρίσκονται στην αριστερή πλευρά της διεπαφής λειτουργίας Kiosk, κάτω από τον τίτλο του βήματος:
Σε ορισμένες περιπτώσεις, ο οδηγός που καθοδηγεί τη λειτουργία Kiosk μπορεί επίσης να δώσει εντολή στον χειριστή να τραβήξει φωτογραφίες, για παράδειγμα με μια φορητή κάμερα, και στη συνέχεια να εισαγάγει τις εικόνες πριν γίνει διαθέσιμη η επιλογή Επόμενο.
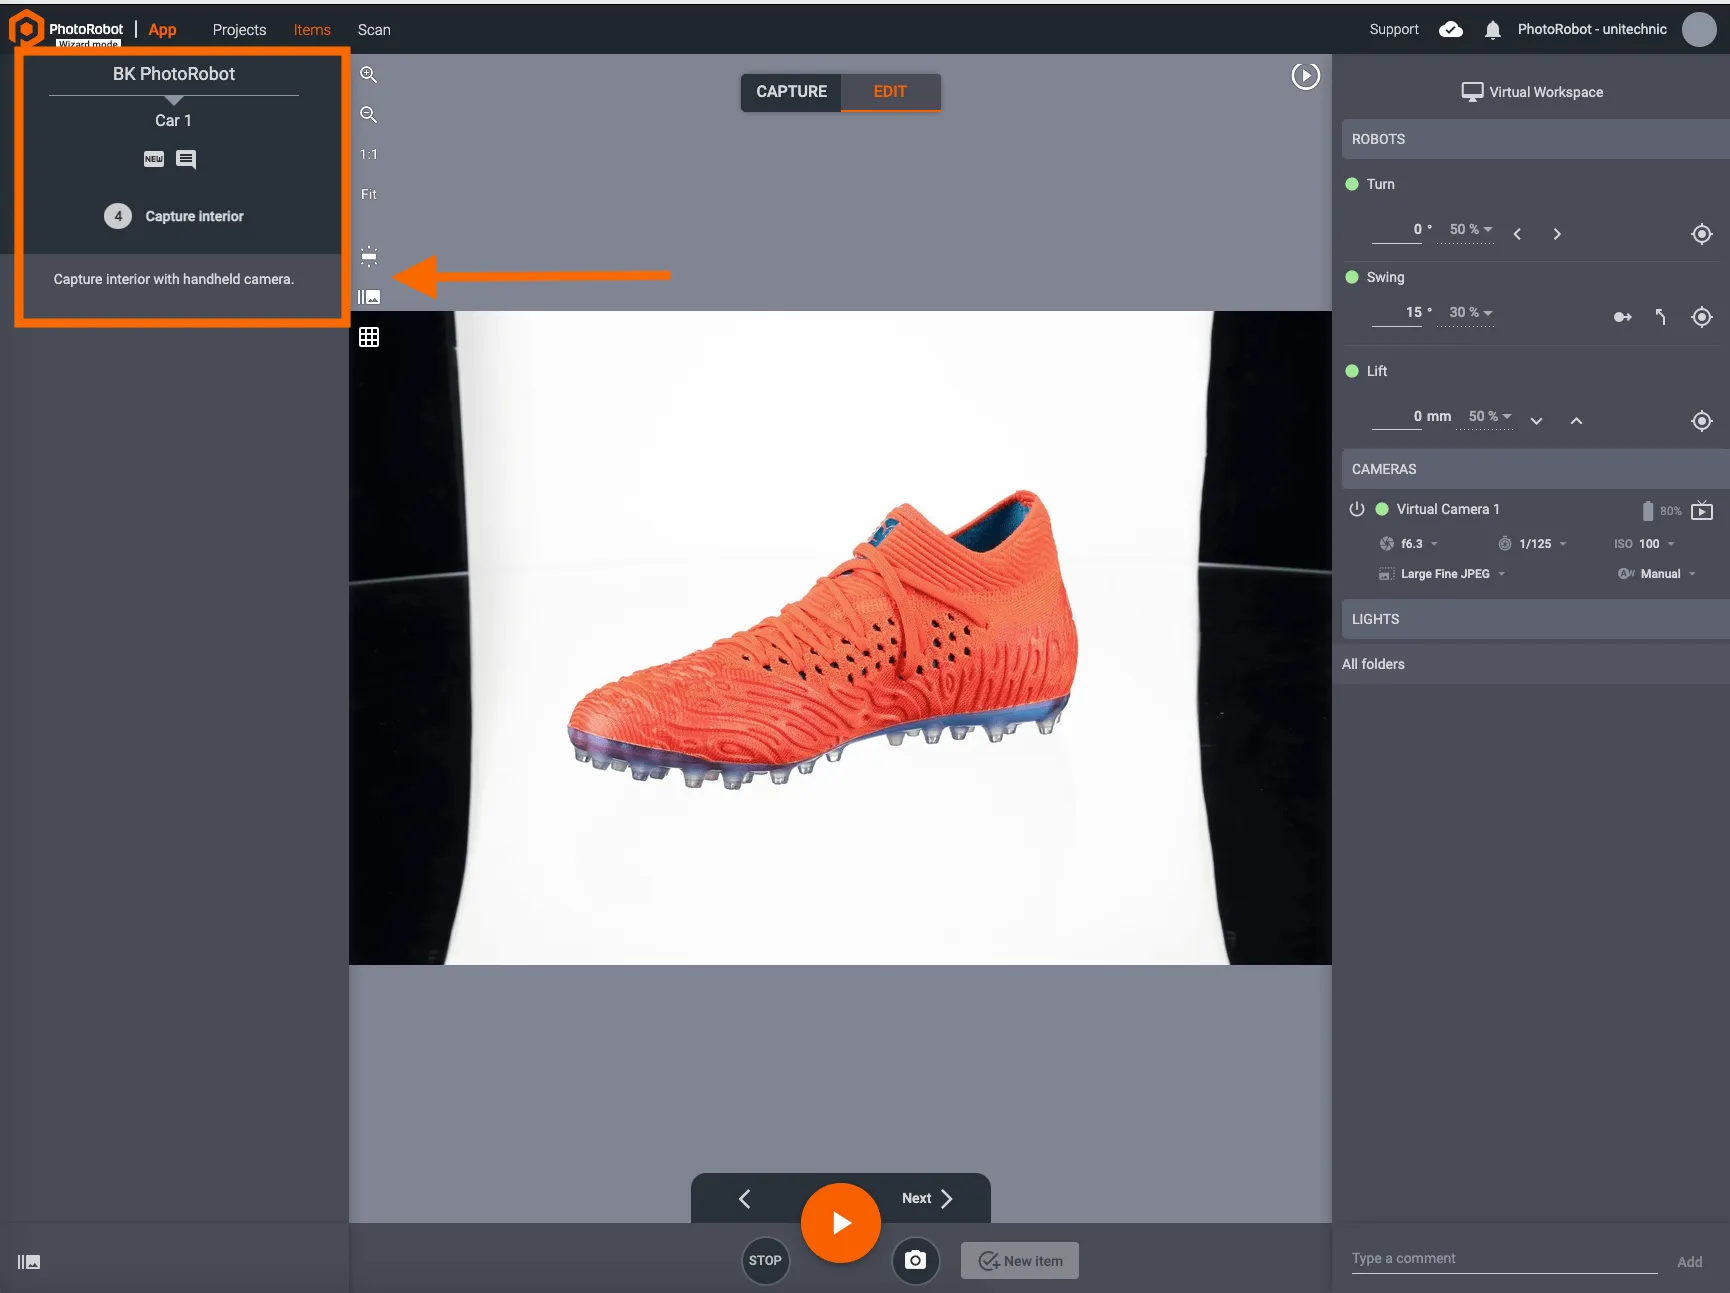
Όταν ολοκληρωθεί κάθε στάδιο, κάνοντας κλικ στο Νέο στοιχείο στο κάτω μέρος της διεπαφής ολοκληρώνεται η λειτουργία Kiosk με οδηγό:
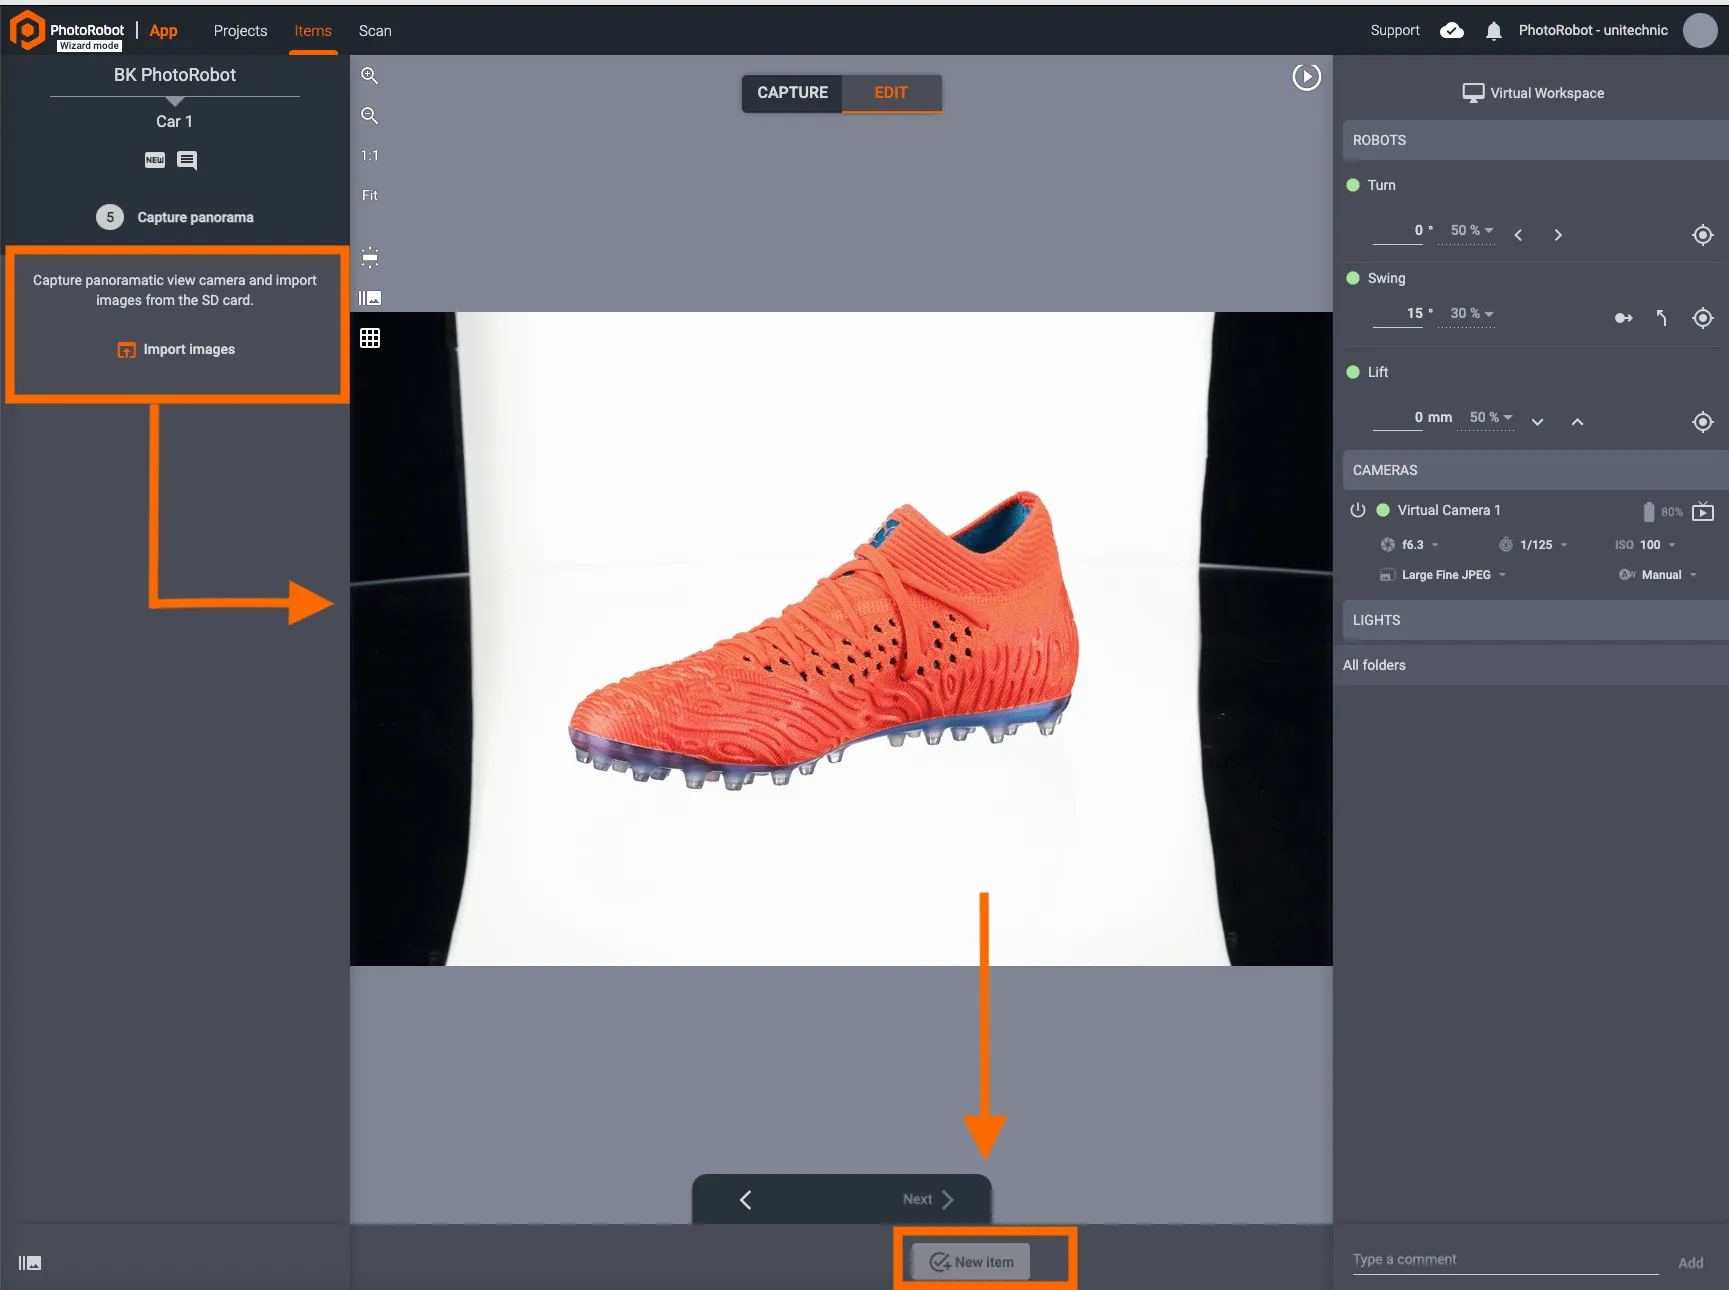
Μετά το κλικ στο Νέο στοιχείο, ο χρήστης επιστρέφει στην αρχική σελίδα του Wizard. Εδώ, είναι δυνατό να εξέλθετε από τον Wizard που χρησιμοποιείται για τη λειτουργία Kiosk, ή να συνεχίσετε στο επόμενο στοιχείο.
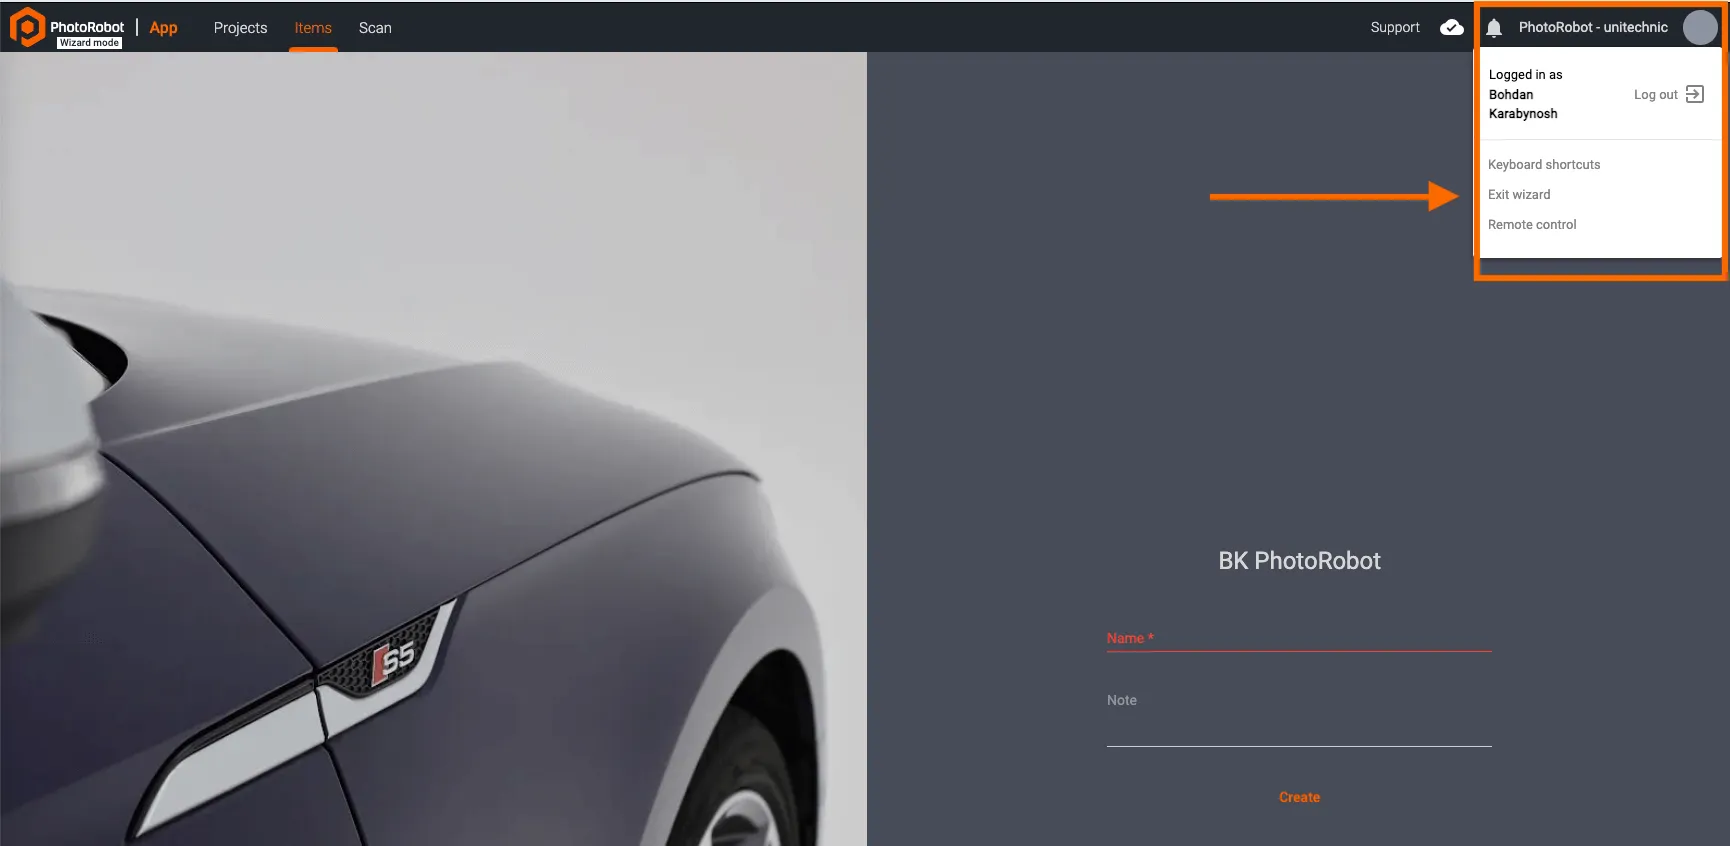
Για έξοδο από τον Οδηγό, κάντε κλικ στο Εικονίδιο Λογαριασμού στο επάνω δεξιό μέρος της διεπαφής και κάντε κλικ στο Έξοδος από τον οδηγό:
Εάν συνεχίσετε σε άλλο στοιχείο που υπάρχει στο σύστημα, είναι επίσης δυνατό να φορτώσετε στοιχεία για λήψη μέσω των ρυθμίσεων του Οδηγού αλλάζοντας το πρώτο βήμα σε "πληκτρολογήστε": "select-item":
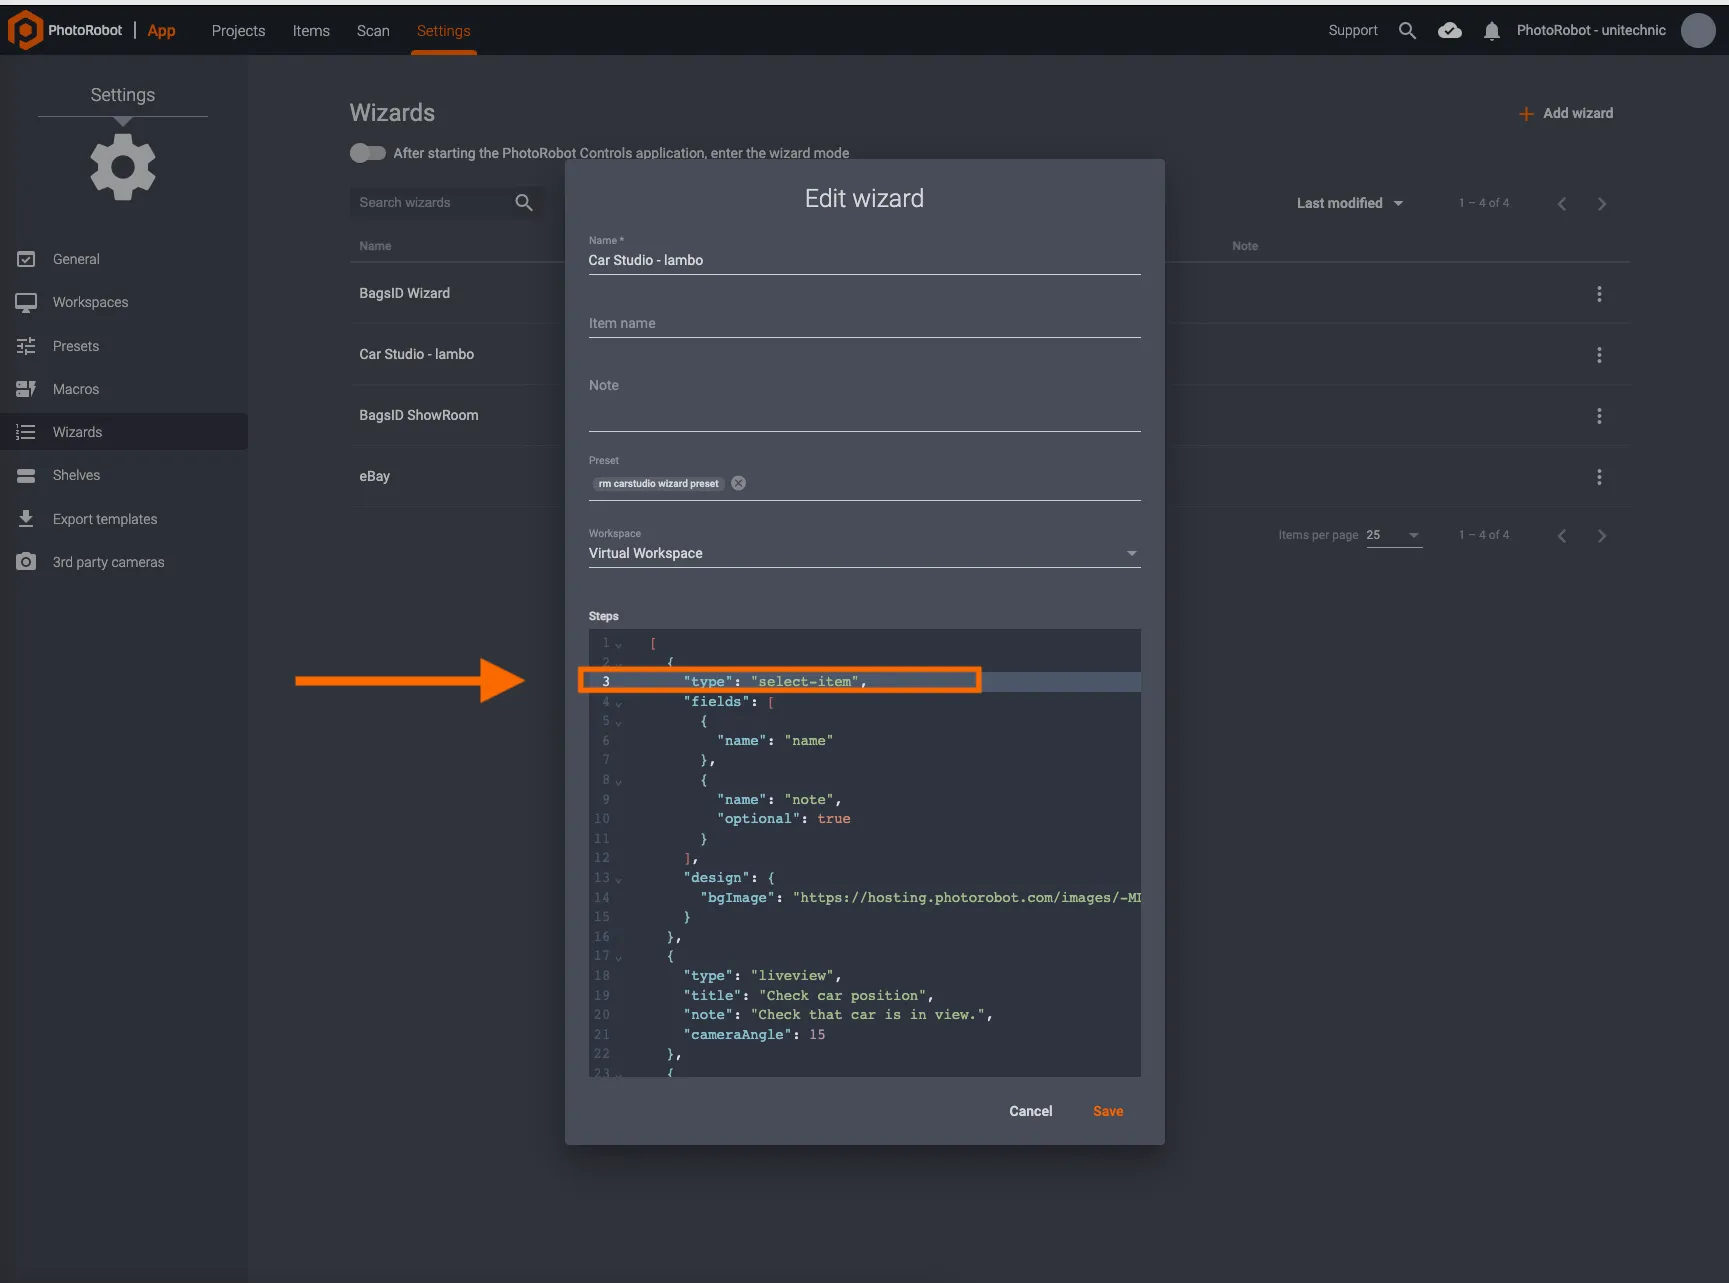
Μετά τη διαμόρφωση του “type”: “select -item”, οι χρήστες μπορούν στη συνέχεια να επιλέξουν στοιχεία εισάγοντας το όνομα του στοιχείου στην οθόνη εκκίνησης της λειτουργίας Περιπτέρου για αυτόν τον οδηγό:
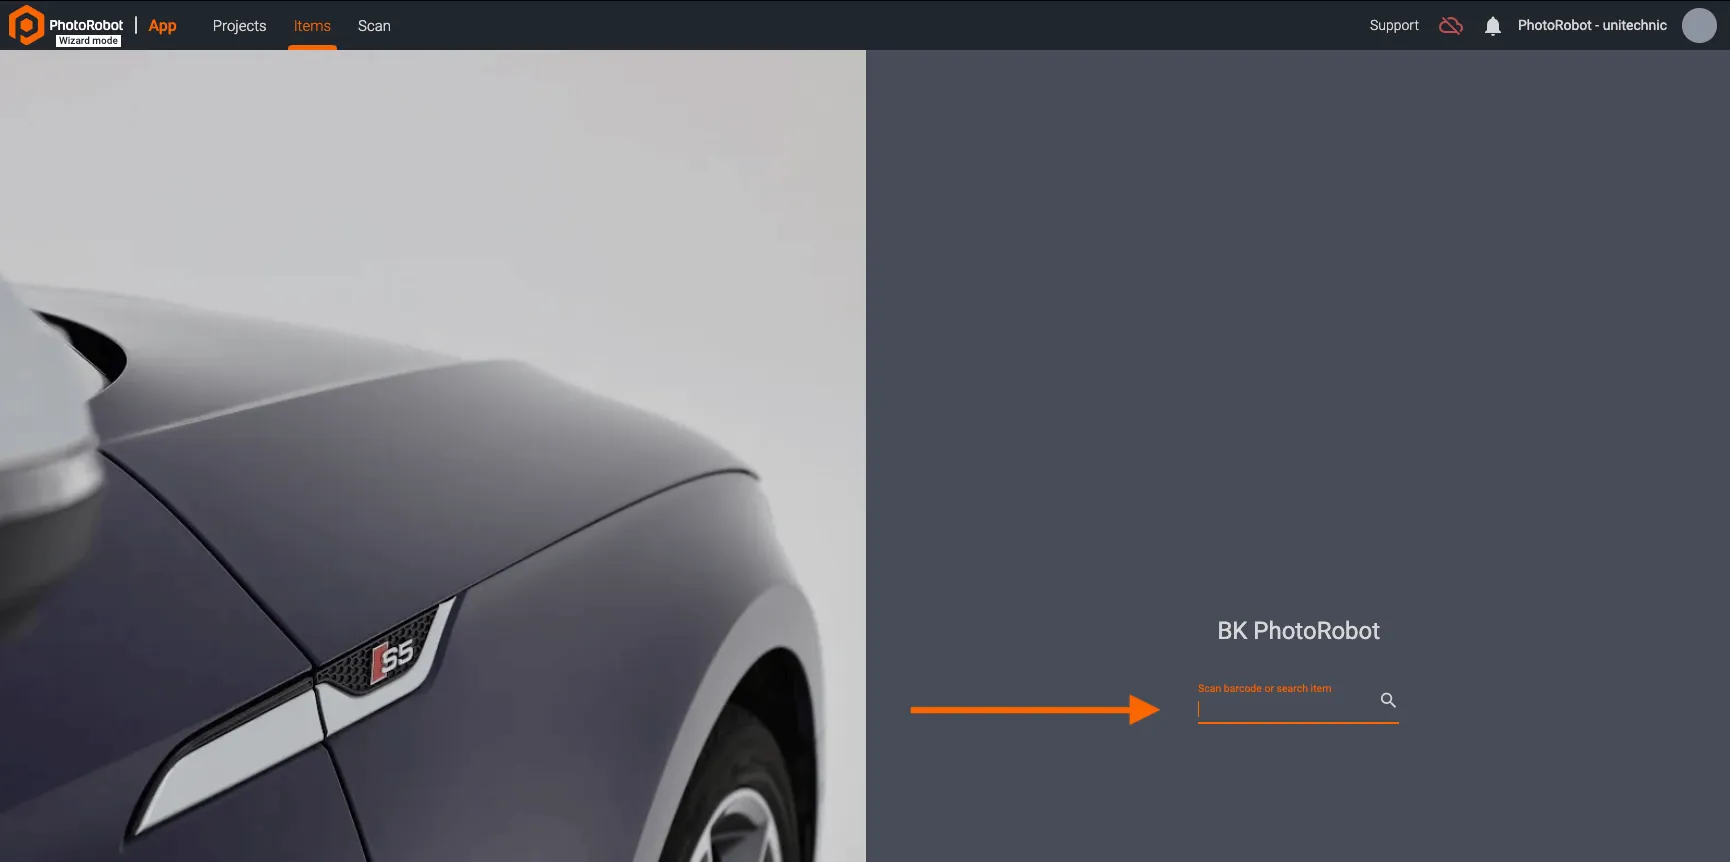
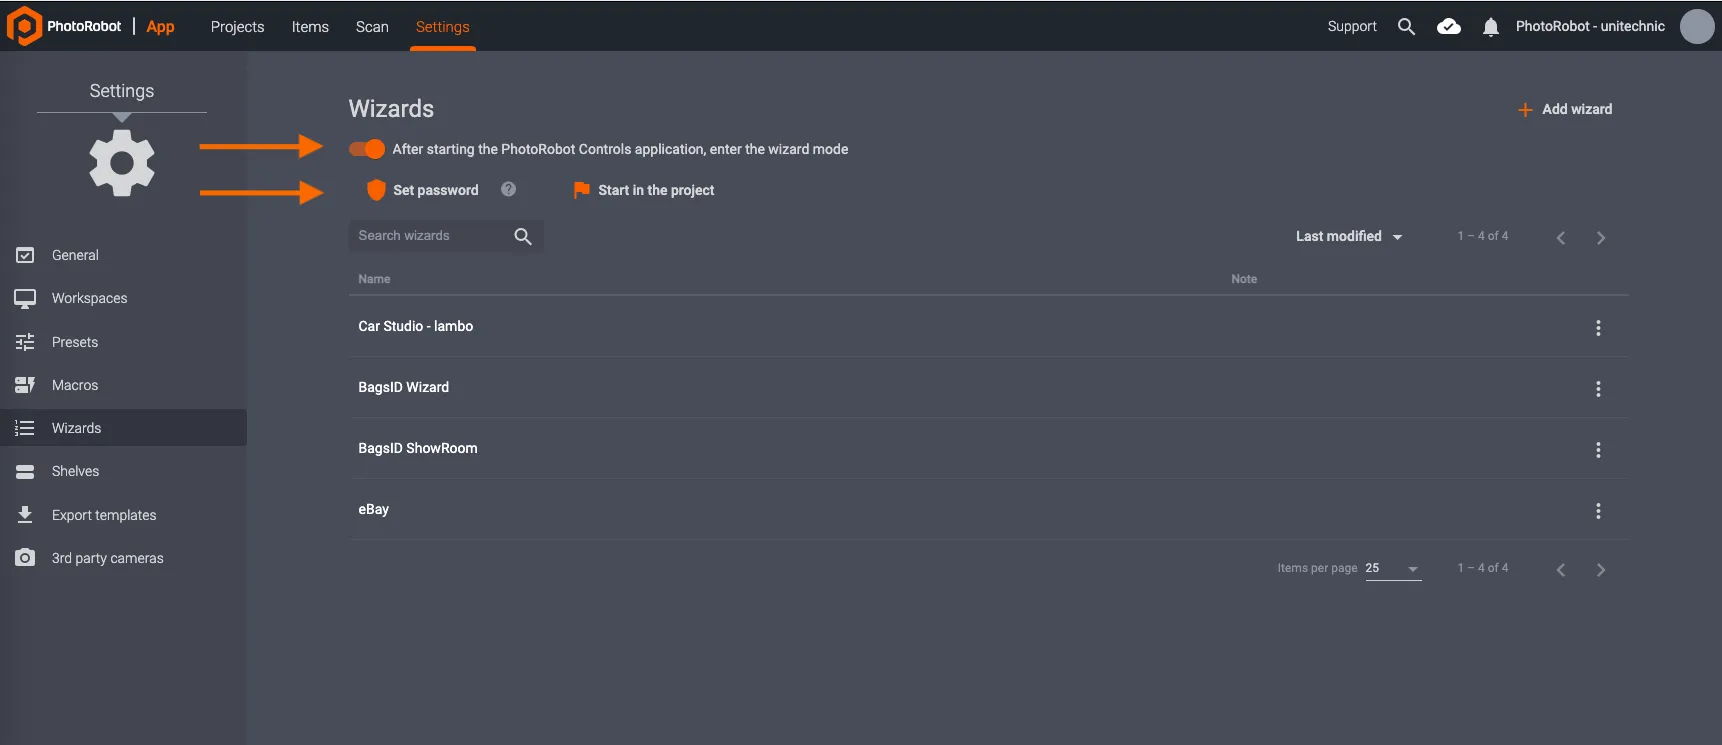
Τέλος, είναι επίσης δυνατό να ενεργοποιήσετε την προστασία με κωδικό πρόσβασης για τη λειτουργία οδηγών, ή να ορίσετε ένα Έργο που θα ξεκινάει από προεπιλογή σε λειτουργία Kiosk με οδηγό. Βρείτε αυτές τις επιλογές κατά την εκκίνηση του CAPP πλοηγώντας στις Ρυθμίσεις και κάνοντας κλικ στους Οδηγούς.
Οι κορυφαίες επιλογές του μενού παρέχουν έναν διακόπτη ΕΝΕΡΓΟΠΟΙΗΣΗΣ / ΑΠΕΝΕΡΓΟΠΟΙΗΣΗΣ για αυτόματη είσοδο σε λειτουργία Οδηγού / Περιπτέρου μετά την εκκίνηση του CAPP. Κάτω από αυτό, οι χρήστες μπορούν να κάνουν κλικ στο Ορισμός κωδικού πρόσβασης για να ενεργοποιήσουν την προστασία με κωδικό πρόσβασης.


Σειρά EOS Rebel


Σειρά EOS DSLR


Σειρά καθρέπτη EOS M


Σειρά PowerShot


Κοντινό πλάνο / χειρός

Η σειρά Canon EOS Rebel Series προσφέρει φωτογραφικές μηχανές DSLR φιλικές για αρχάριους με σταθερή ποιότητα εικόνας, διαισθητικά χειριστήρια και ευέλικτες λειτουργίες. Ιδανικές για τους λάτρεις της φωτογραφίας, αυτές οι κάμερες παρέχουν αξιόπιστη αυτόματη εστίαση, οθόνες αφής μεταβλητής γωνίας και εγγραφή βίντεο Full HD ή 4K.
Σύνδεση
Ανάλυση (MP)
Ψήφισμα
Η σειρά Canon EOS DSLR προσφέρει εικόνες υψηλής ποιότητας, γρήγορη αυτόματη εστίαση και ευελιξία, καθιστώντας την ιδανική τόσο για τη φωτογραφία όσο και για την παραγωγή βίντεο.
Σύνδεση
Ανάλυση (MP)
Ψήφισμα
Η σειρά Canon EOS M Mirrorless Series συνδυάζει τη σχεδίαση μικρών διαστάσεων με απόδοση τύπου DSLR. Με εναλλάξιμους φακούς, γρήγορη αυτόματη εστίαση και αισθητήρες εικόνας υψηλής ποιότητας, αυτές οι κάμερες είναι ιδανικές για ταξιδιώτες και δημιουργούς περιεχομένου που αναζητούν φορητότητα χωρίς να θυσιάζουν την ποιότητα της εικόνας.
Σύνδεση
Ανάλυση (MP)
Ψήφισμα
Η σειρά Canon PowerShot προσφέρει συμπαγείς, φιλικές προς το χρήστη κάμερες για περιστασιακούς σκοπευτές και λάτρεις. Με μοντέλα που κυμαίνονται από απλές λήψεις έως προηγμένες κάμερες ζουμ, παρέχουν ευκολία, σταθερή ποιότητα εικόνας και λειτουργίες όπως σταθεροποίηση εικόνας και βίντεο 4K.
Σύνδεση
Ανάλυση (MP)
Ψήφισμα
Οι φωτογραφικές μηχανές Canon Close-Up &; Handheld έχουν σχεδιαστεί για λεπτομερείς, κοντινές φωτογραφίες και βίντεο. Συμπαγείς και εύχρηστες, προσφέρουν εστίαση ακριβείας, απεικόνιση υψηλής ανάλυσης και ευέλικτες δυνατότητες μακροεντολών, ιδανικές για vlogging, φωτογράφιση προϊόντων και δημιουργικά κοντινά πλάνα.


